

Here ViewSonic provides 3 levels of overdrive, or Response Time levels as they call it in OSD:
- Ultra Fast
- Advanced
- Standard
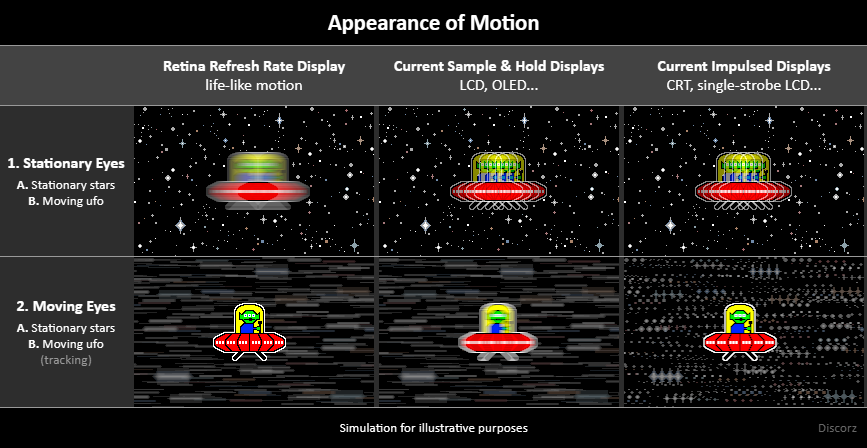
It’s a standard non-variable/fixed gain overdrive. Main downside of such implementation, as mentioned earlier in the article, is that larger gains show more overshoot at lower refresh rates. A gain perfect for 240 is very likely bad for 120 or 60 Hz and needs to be manually corrected. This happens because refresh time interrupts the GtG momentum. The longer the refresh time, the further the interruption and larger the overshoot with overdriven LCD (see animations). For those who switch between refresh/frame rates often, process of constant re-adjusting can be a bit tedious. Unfortunately this is the case with most monitors today.
Normally monitor scalers/TCONs hide a full 64/100/128/255-level overdrive for fine tuning, but for some reason manufacturers provide very few of those to end-user (usually 3-4 levels), which is what we’re seeing here too (see another example here). I should point out that overdrive gain values in OSD were cherry-picked by ViewSonic. Blur Busters was not involved in sample & hold tuning, only in PureXP tuning.
Ideally gain should gradually self-adjust in real-time as refresh time varies. And things are slowly improving in this regard. Nvidia’s G-SYNC (processor) is known to have a very fine variable overdrive implementation. We’re starting to see Asus, Zowie, Samsung and others implement this feature without requiring expensive processors.
For overdrive testing we’ll stick with pursuit camera technique, even though it primarily evaluates a single use case – eye tracking. In real world, we encounter many other. I’m hoping to see more reviewers acknowledge those improvements of higher motion resolution.
Also, VRR range should only be tested in VRR supported programs such as SmoothFrog (by Aperture Grille), but overdrive on some monitors including XG2431, is behaving identical for either fixed or variable refresh rate operations. For that reason we will continue with unsupported TestUFO.
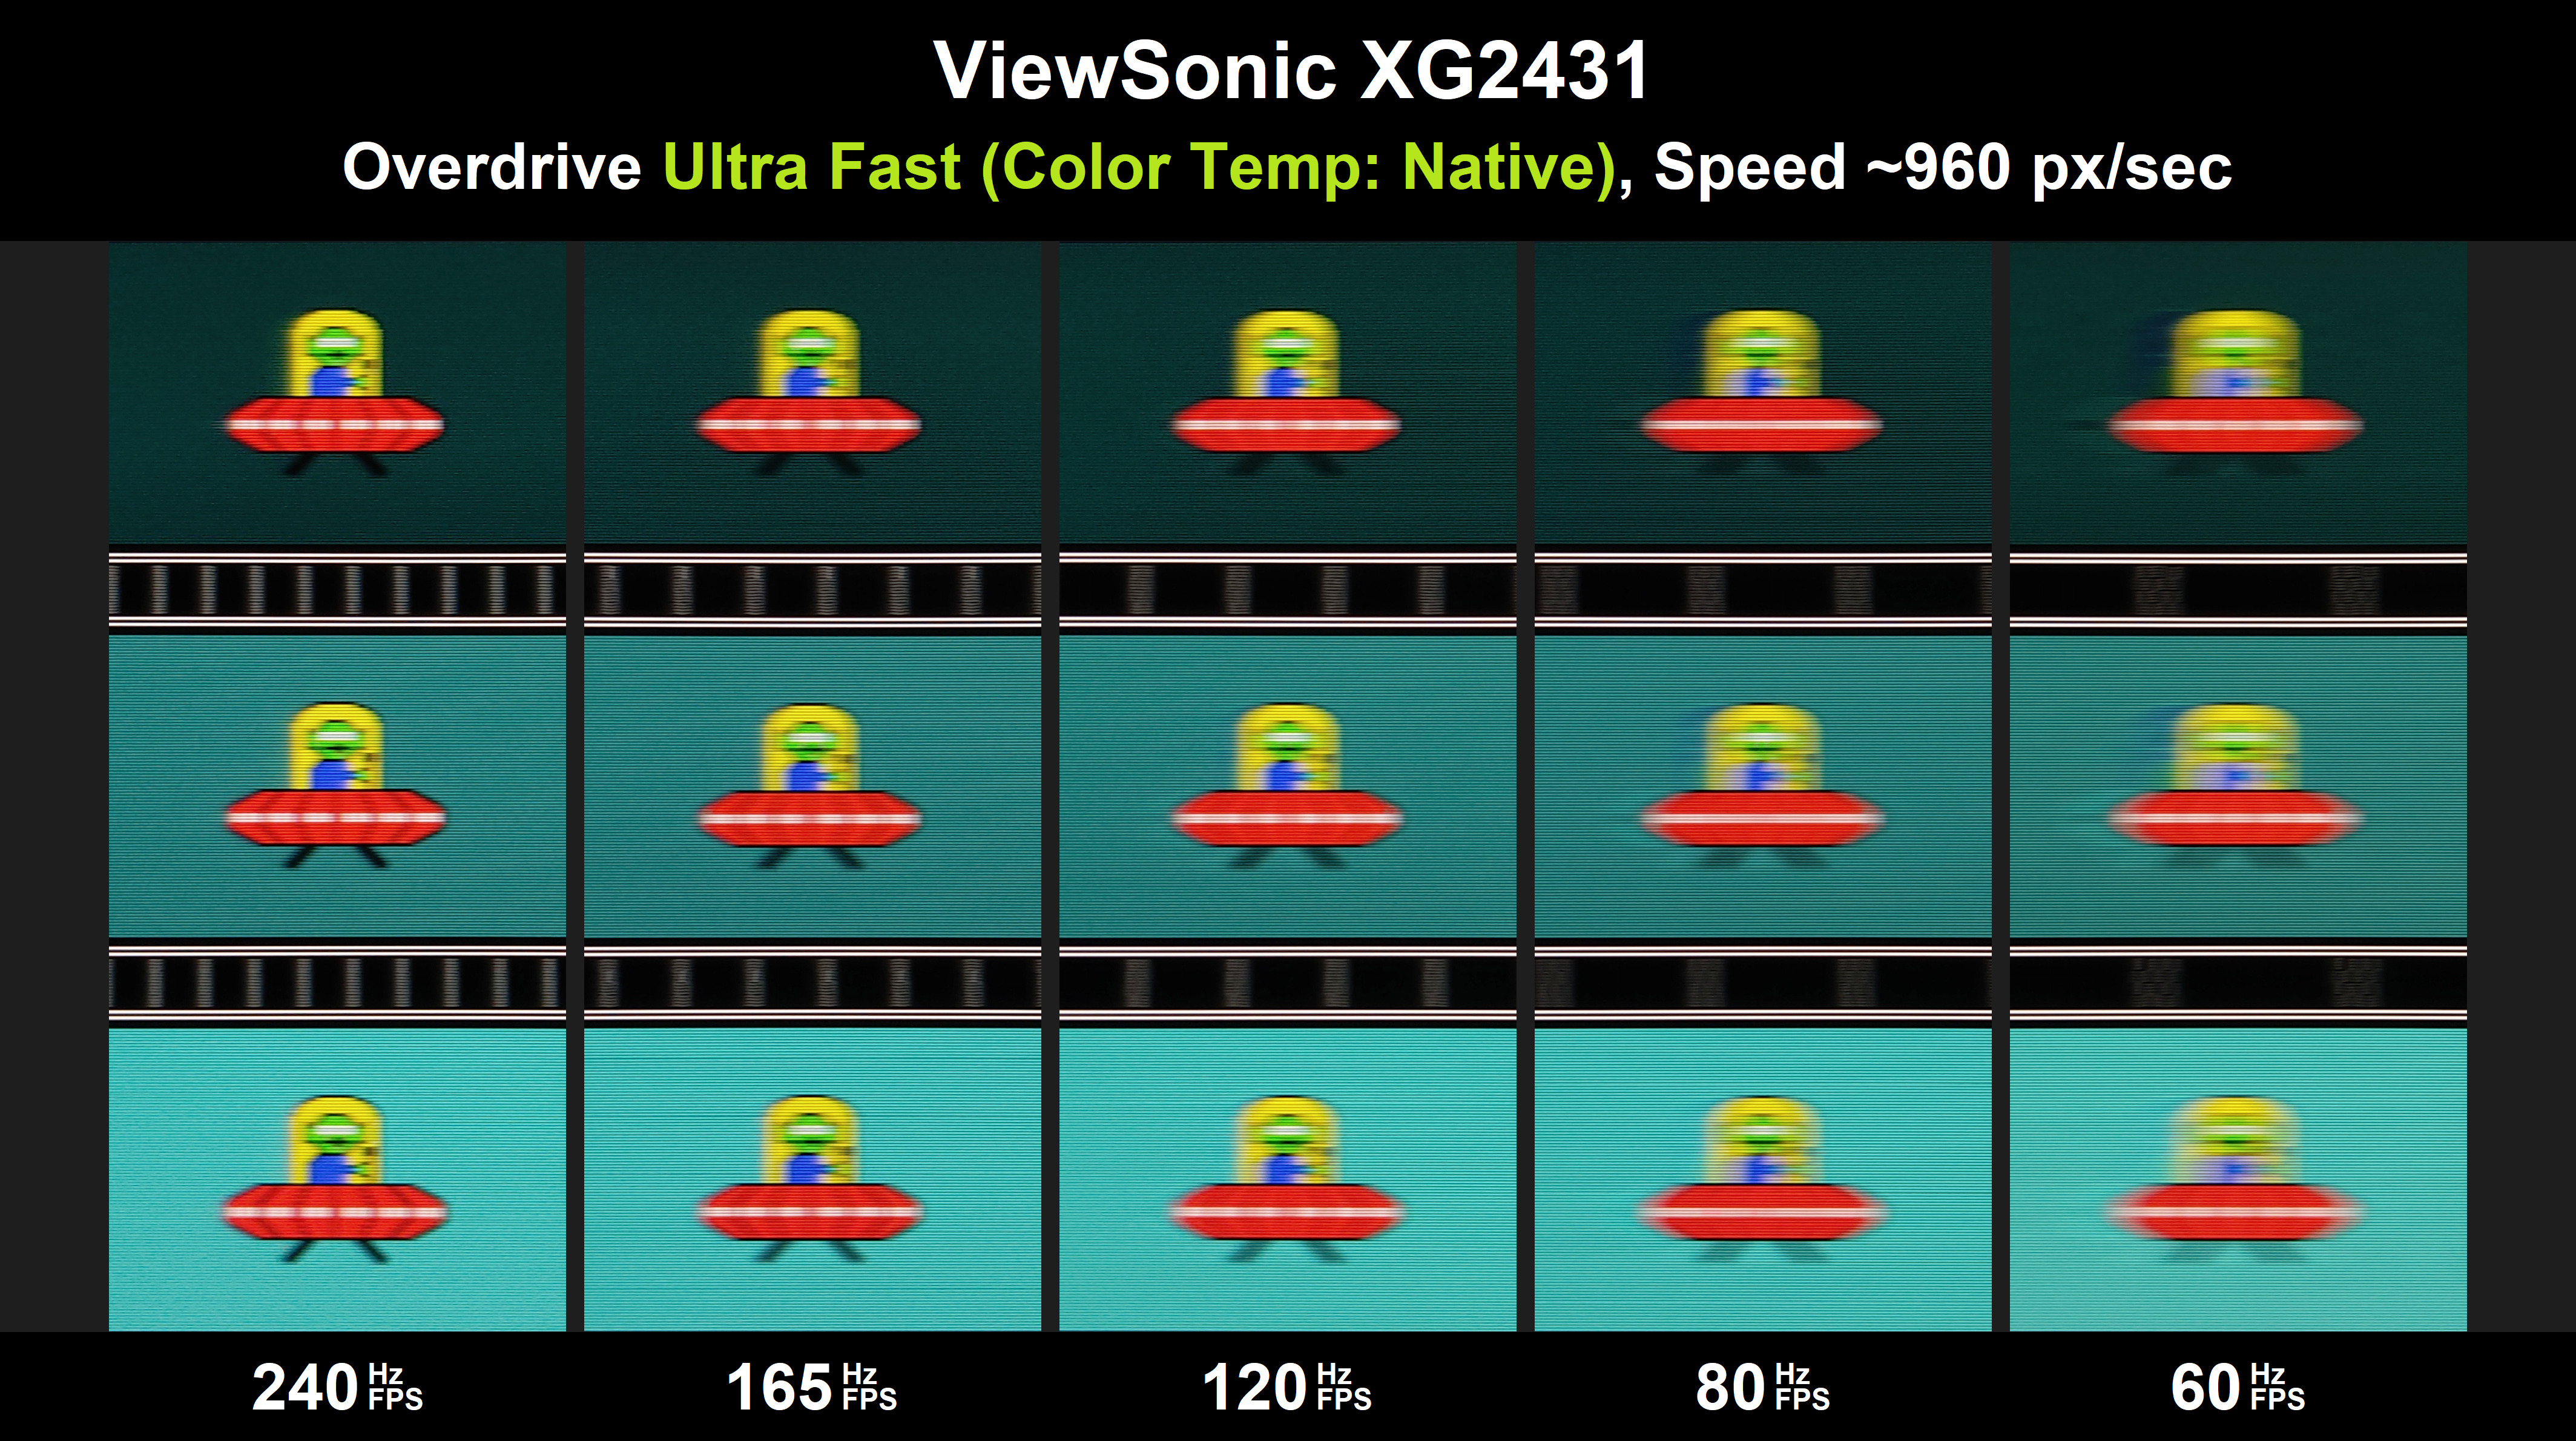
Ultra Fast looks good! At 240 Hz both initial and full response times are moderately sped up with zero overshoot errors. Since XG2431 does not use variable overdrive, overshoot will start to creep in as refresh/frame rate decreases (fixed or in VRR). It faintly appears at ~120 Hz/fps, from ~100 and down it becomes more noticeable. Decent range coverage! This overdrive is my recommendation for the specified range. There is still a bit more room left to push GtG at max Hz. To cover more range without inverse ghosting, ViewSonic had to compromise 240 Hz performance and pick a lower gain. Ultra Fast is most optimal for ~150 Hz/fps. Larger gain would allow better performance at 240 Hz, but unfortunately there are no faster options available in OSD. For this reason requirements of users who game at around 240 Hz/fps may not be fully met!
For VRR XG2431 uses Low Framerate Compensation (LFC). With LFC as soon as frame rate dips below the minimum VRR range value (48 fps) the display driver starts doubling the panel refresh rate to stay within VRR range and synchronized. Higher rate means faster refresh times, so one trick that can help tame the overshoot at lower frame rates is to change the VRR range from default 48-240 to something like 110-240 fps. With this mod overshoot gets cut in half (LFC multiplier dependant) for frame rates below 110. VRR/LFC range can be edited in Custom Resolution Utility (CRU). It’s worth noting that LFC toggling on/off can feel a bit stuttery when frame rate fluctuates just around the threshold. In that case change the value to something more appropriate.
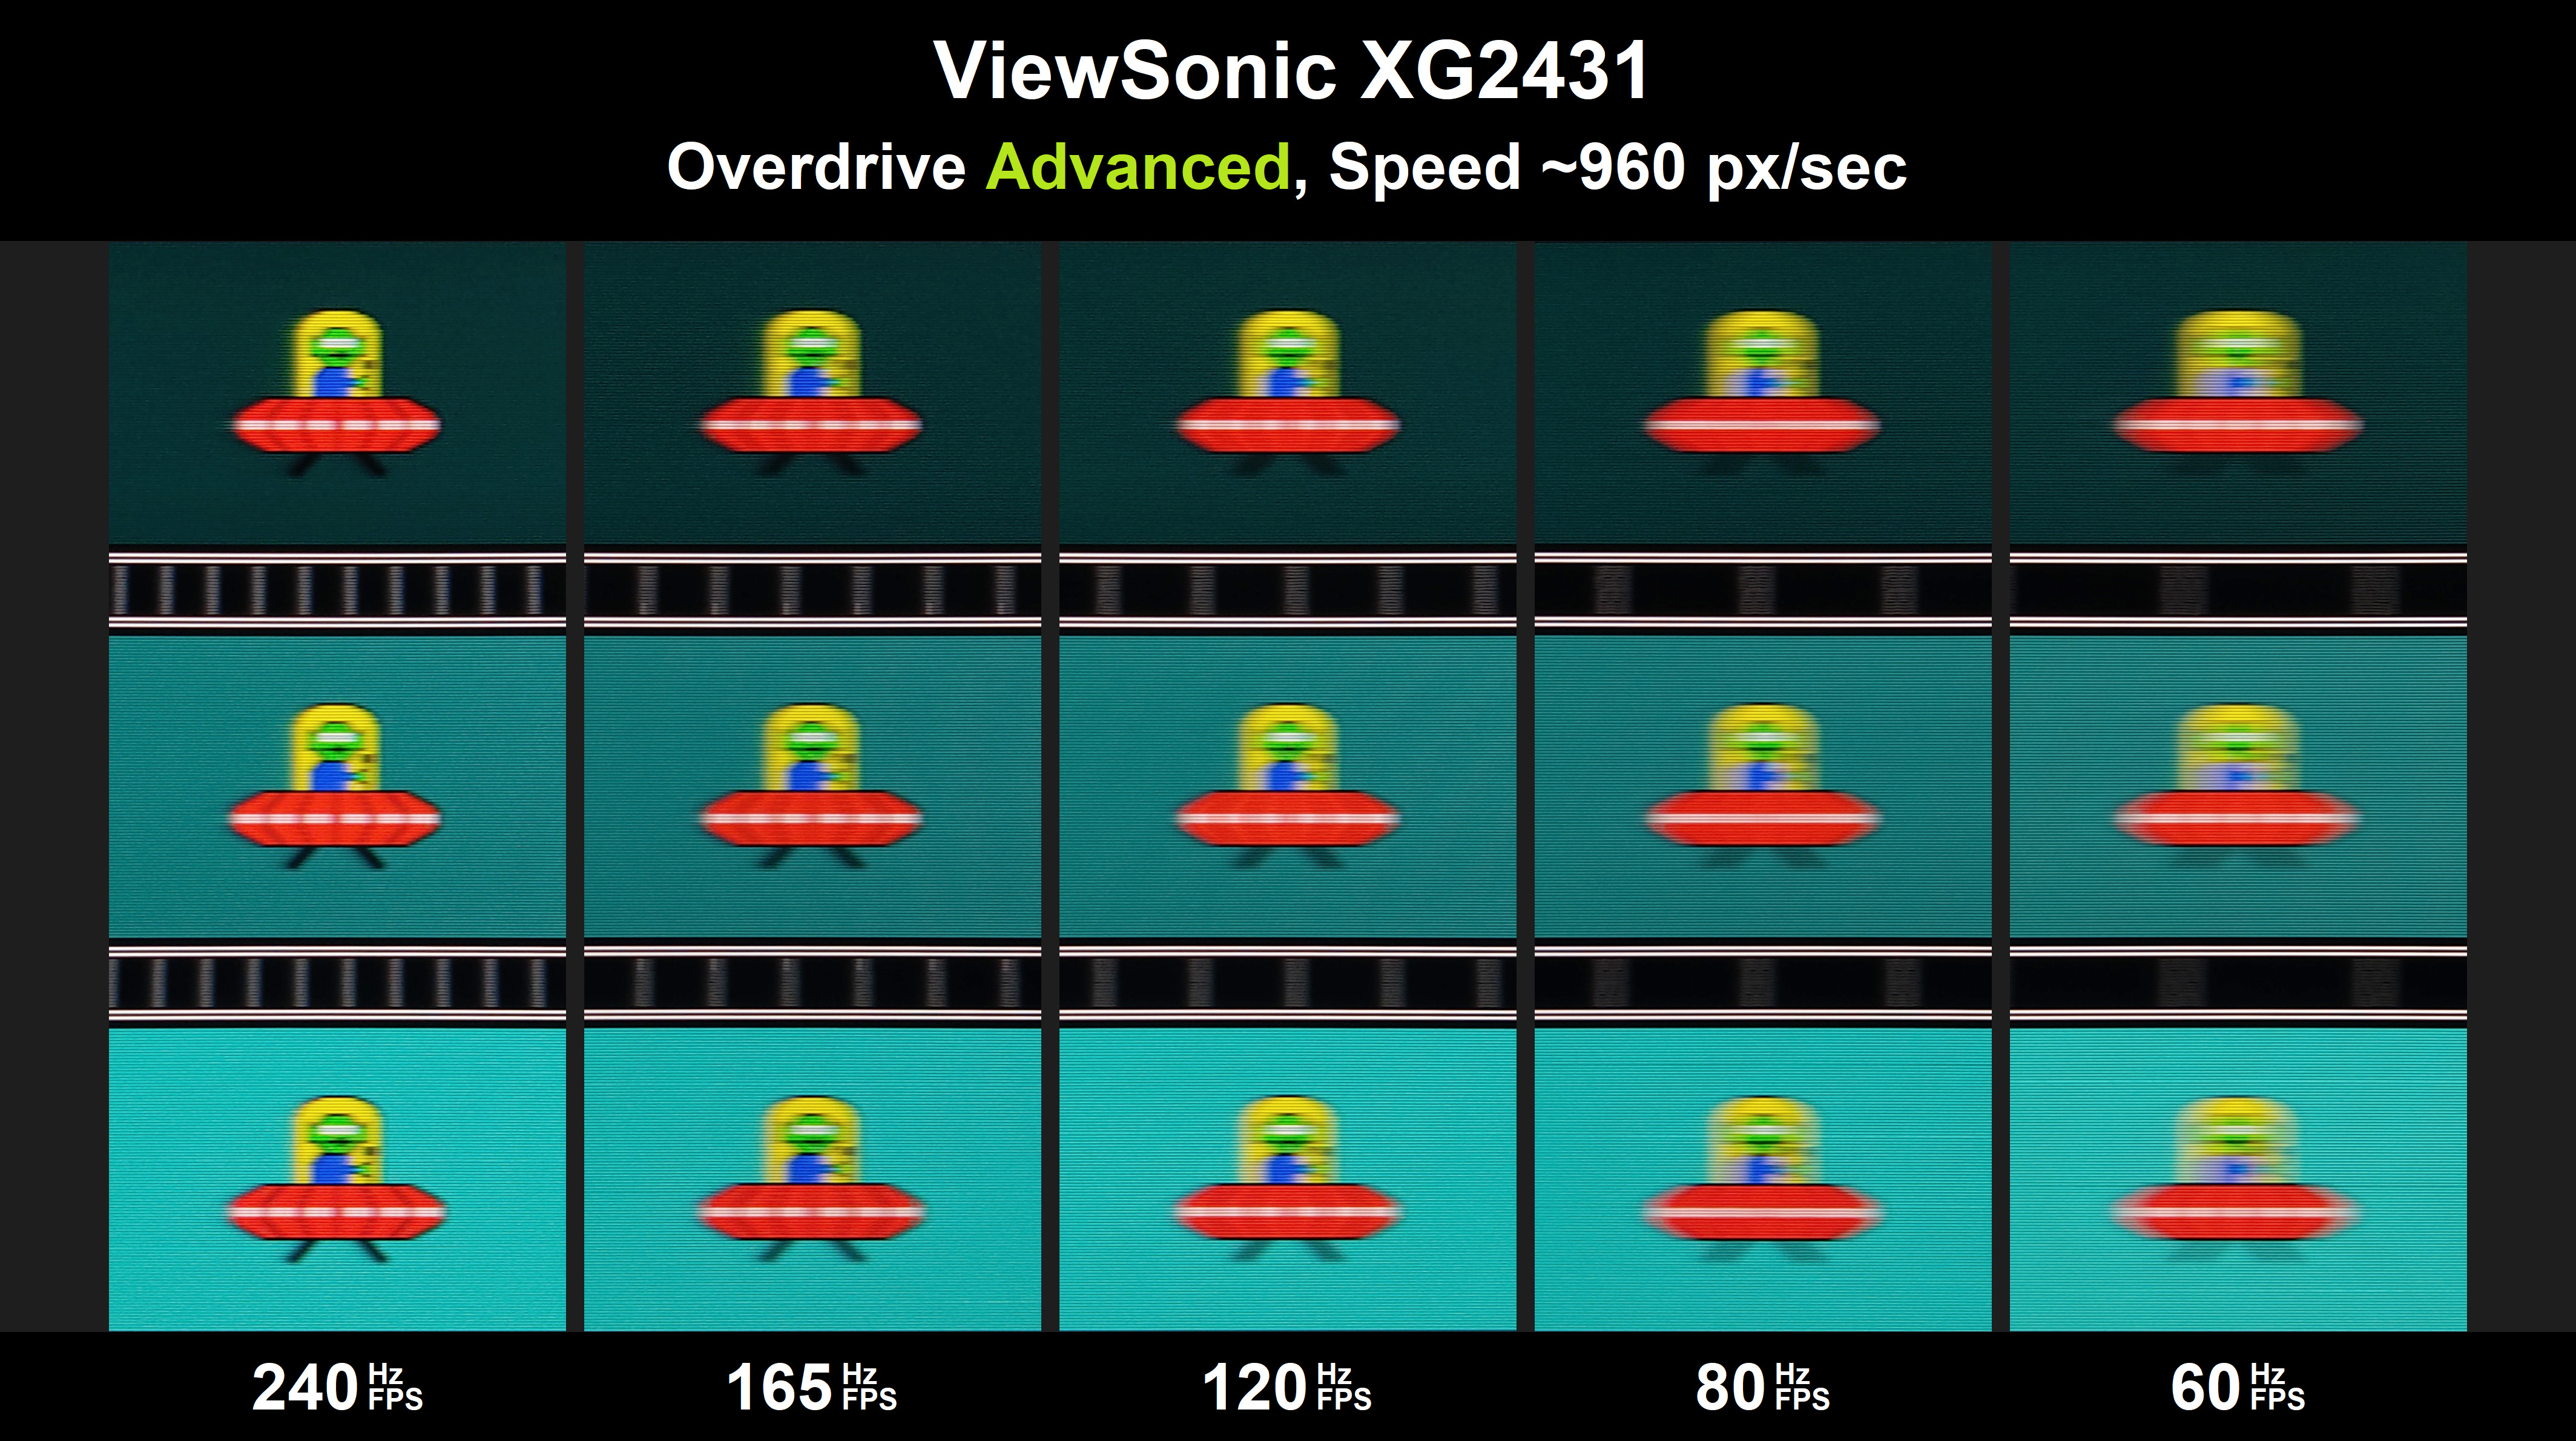
At expense of slower GtG, Advanced manages to cover full range with basically no overshoot. It performs best at ~90 and 240 Hz is less decent. Overshoot at 60 can be spotted in specific tests, but it is very faint and not noticeable in practice. It’s fine even at 48 Hz. This is a set-and-forget option for those who utilize full or lower-end range on a daily basis.
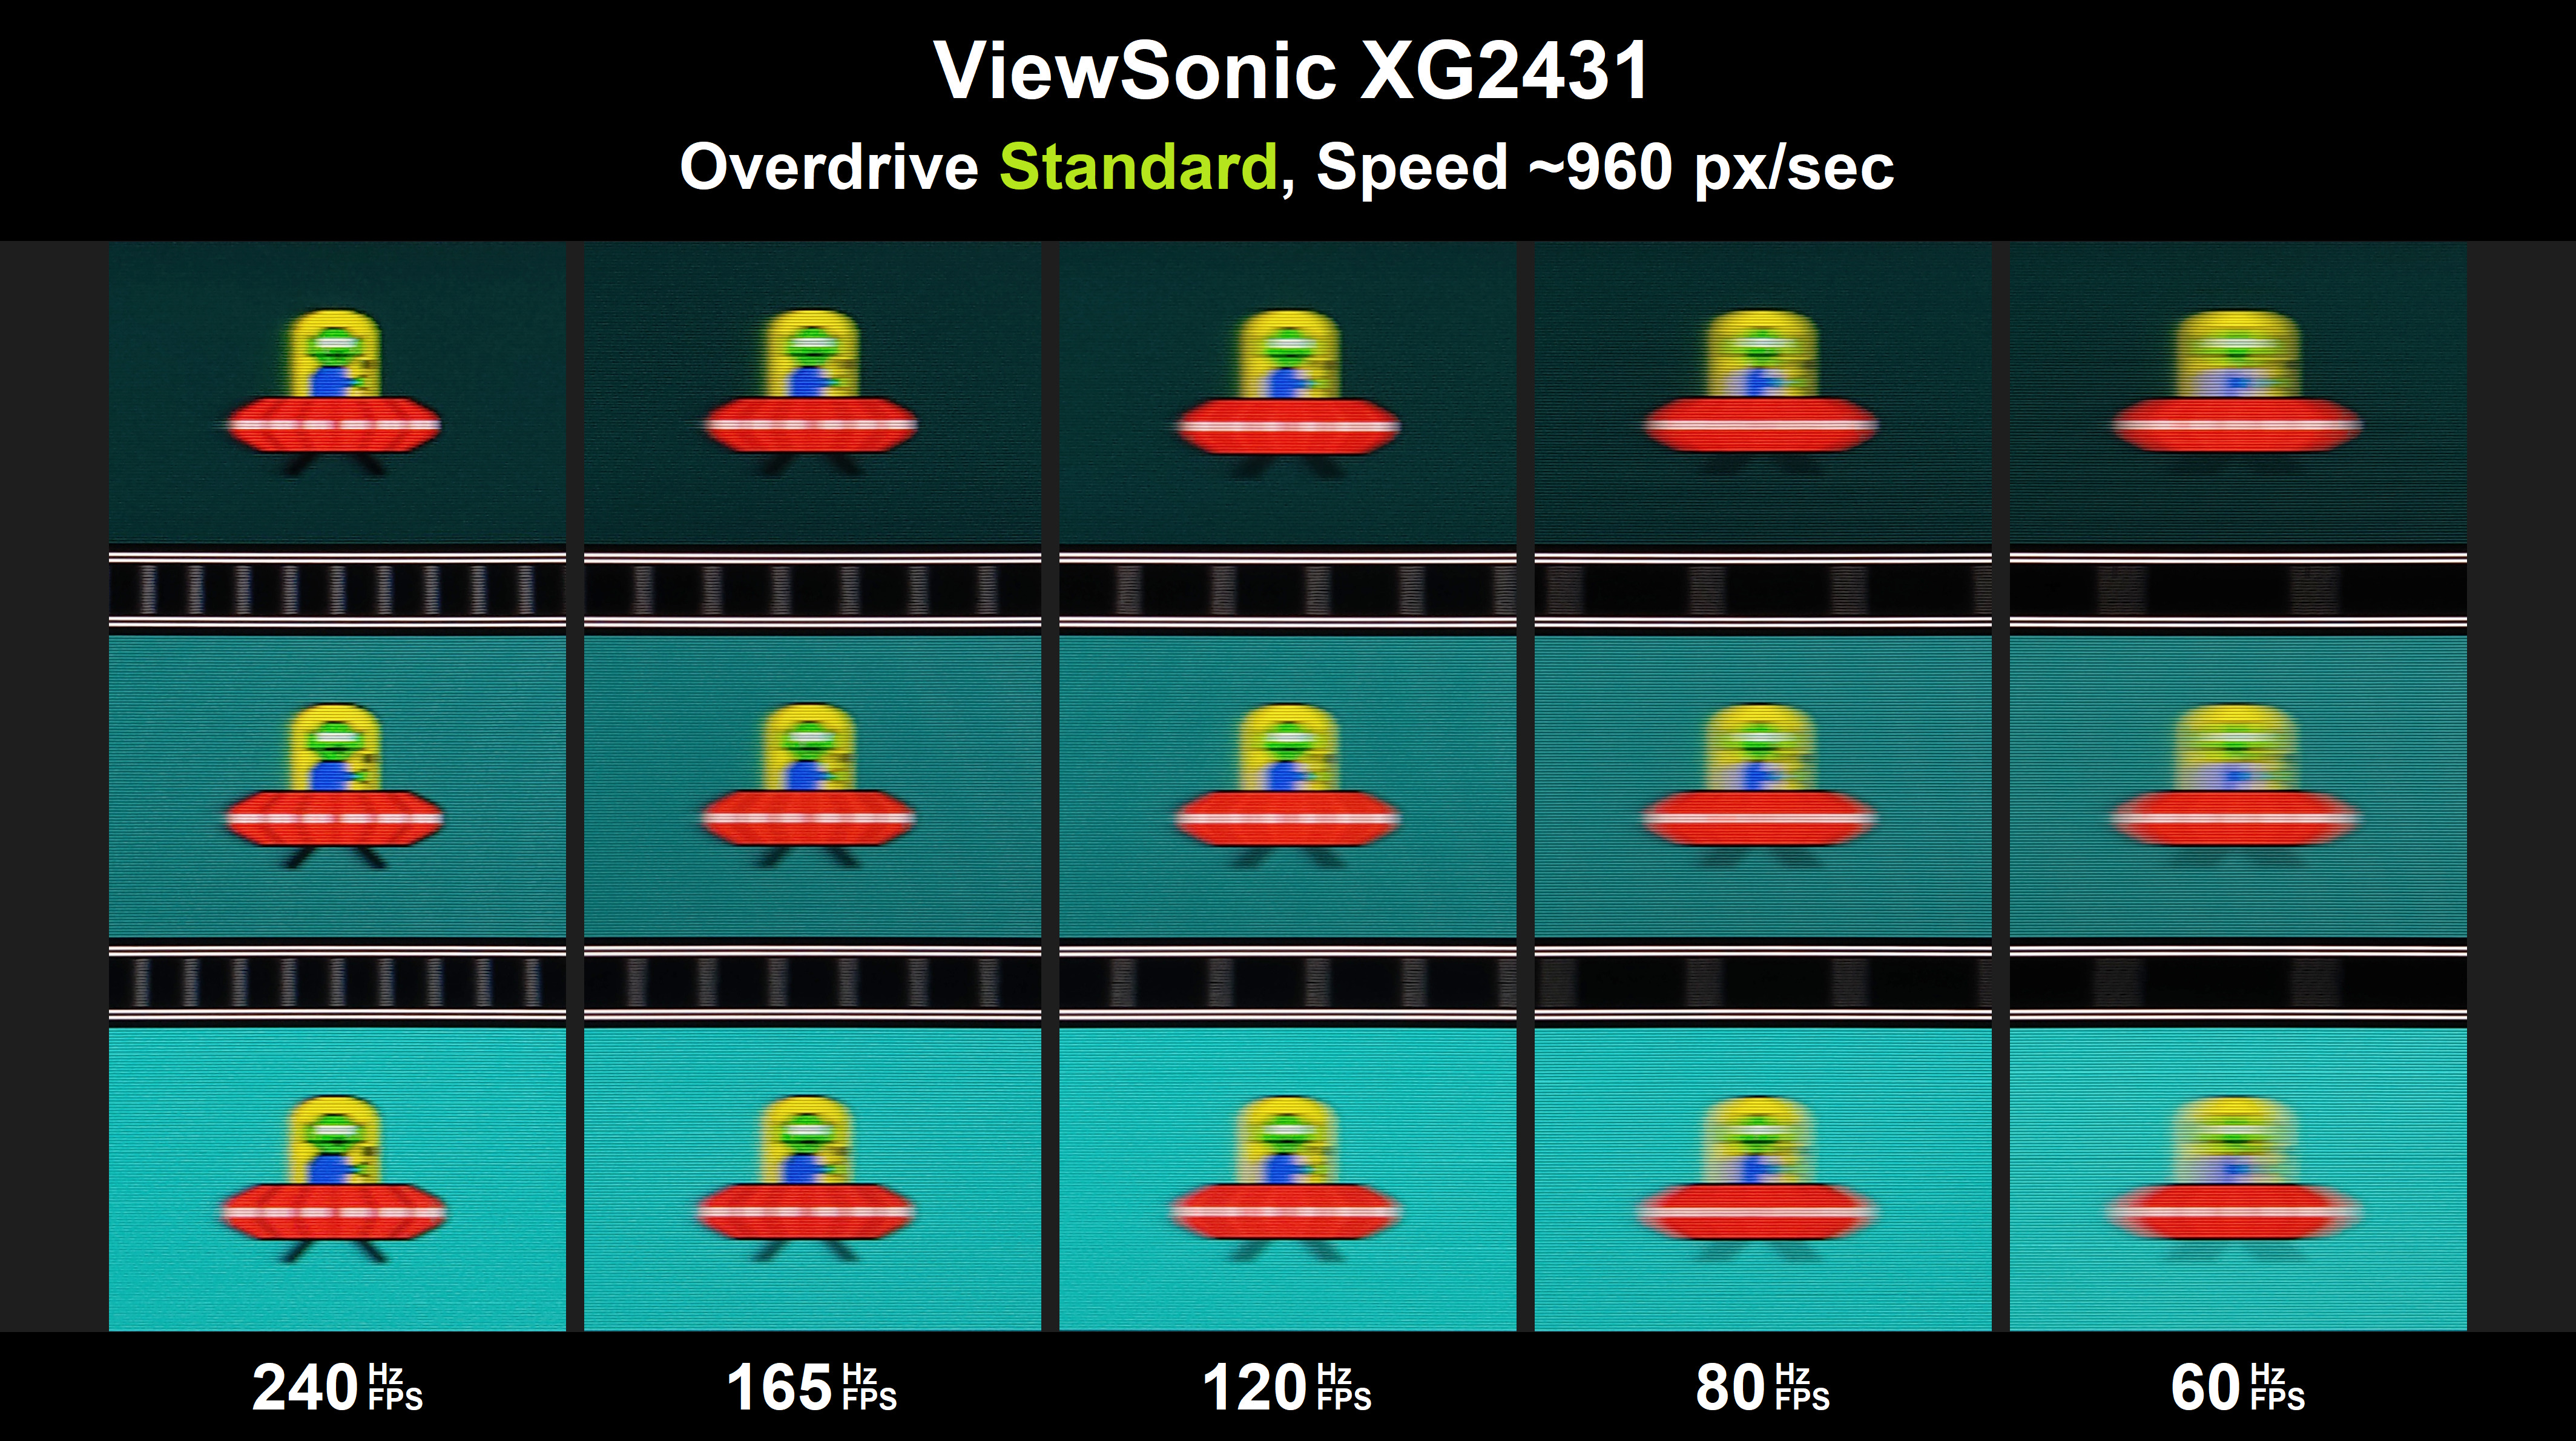
Standard is OFF setting. At high refresh rates the difference between Standard and Advanced is very tiny, while at lower end its more spotable. The very faint overshoot of Advanced at 60 Hz/fps is gone, but ghost trail is slightly more pronounced. OFF setting generally serves no purpose, but is usefull for checking panel’s native GtG performance. For some reason Standard is a factory default overdrive.
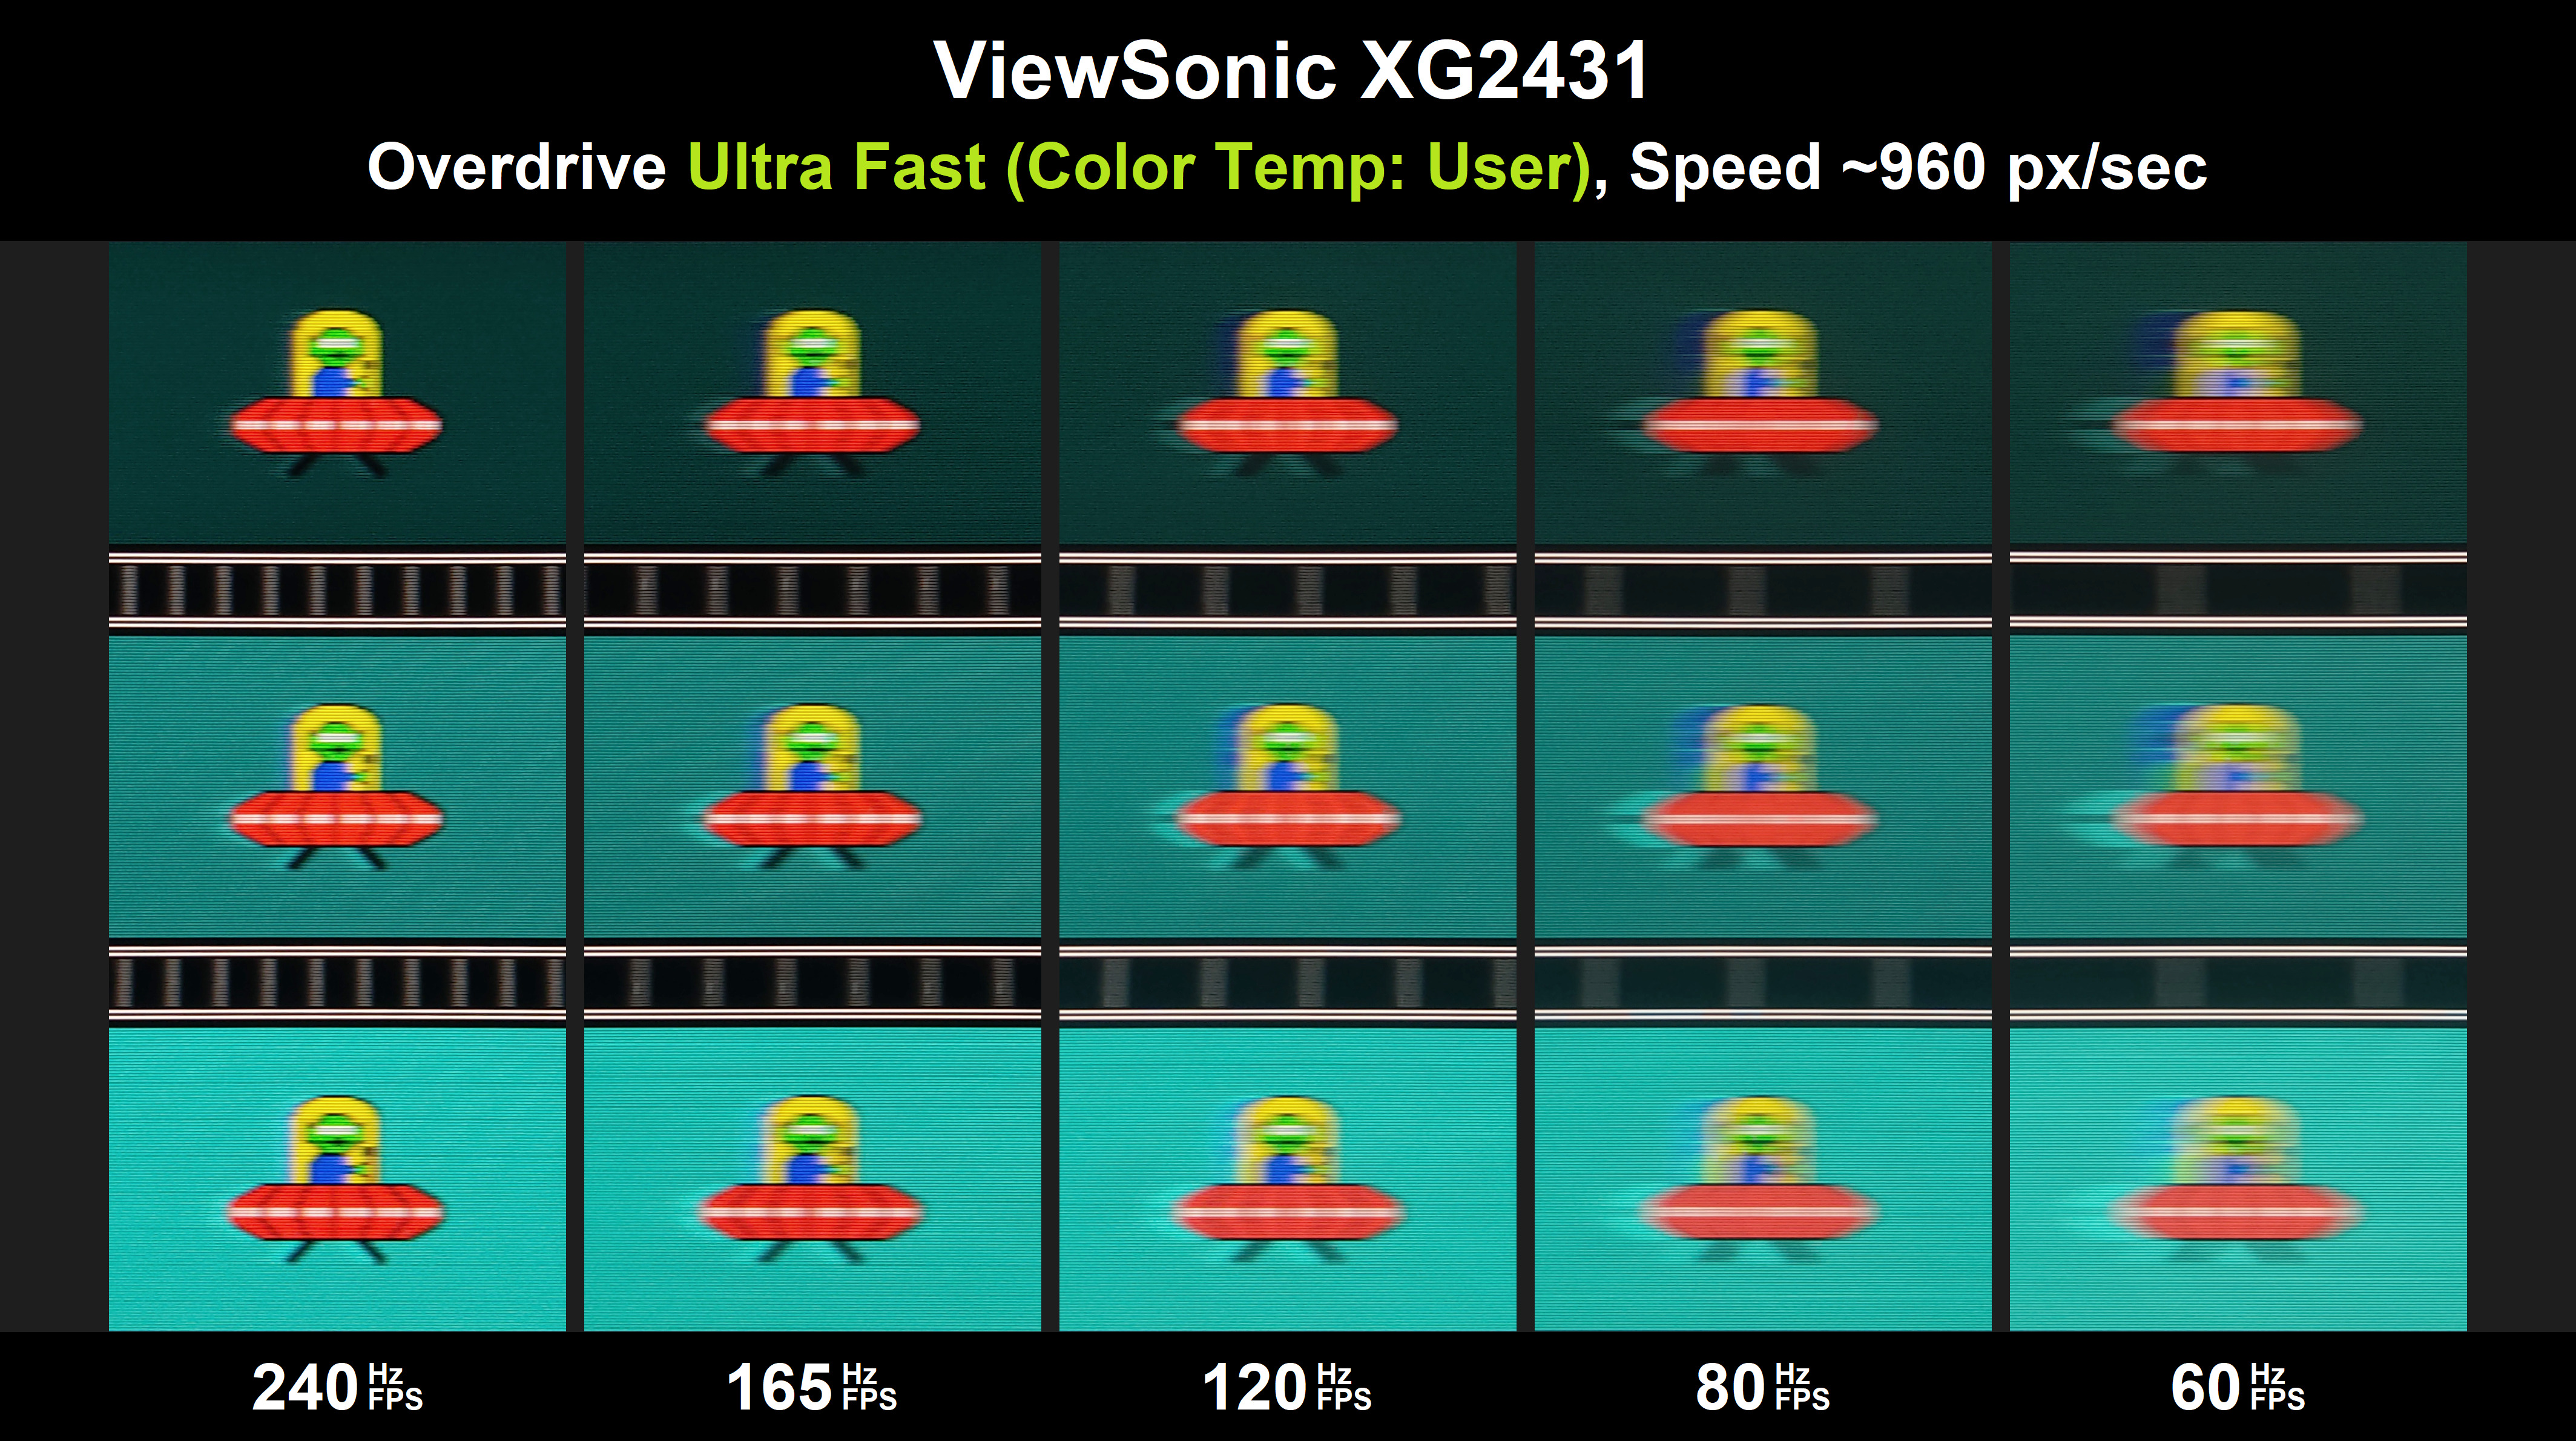
Interestingly Ultra Fast behaves differently when “User” Color Temperature is used. It appears to bug into a much larger OD gain. Unlike with other temperature settings, “User” excessively overshoots throughout the range. 240 Hz doesn’t look good, let alone 60. Standard and Advanced overdrive seem to not be affected by color temperature setting. This leaves users with less options if they decide to manually balance color. Thankfully “Native” Color Temp is fairly accurate according to other reviews so you won’t have to bother with manual adjustments. Native is also a factory default setting. Combining the two should be avoided for obvious reasons, but some users prefer a more responsive feeling of overboosted GtG so it may end up being weirdly useful. The bug might be due to firmware leftovers. Some other ViewSonic models had more levels (Standard, Fast, Faster, Ultra Fast, Fastest), of which last one was usually just as aggressive.
GtG Response Times Measurements
I do not own response time measuring tools but we have a great community that can help us with that (big thanks to Axaion). Measurements were done with Open Source Response Time Tool (OSRTT). A default tolerance of fixed RGB 5 was used for initial and perceived response. Complete response is same as perceived but with no tolerance, meaning initial and perceived response can be identical if transitions don’t overshoot.


Measurements were taken at fixed refresh rate with vsync disabled. Because of that OSRTT had issues reading first crosspoint for some of the transitions, so few of those had to be manually corrected (marked italic).
For those who want to check originals or GtG times for other tolerances or play around with graphs, I’ve uploaded all the .csv files together with transitions images to google drive.
Findings
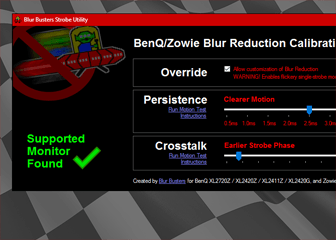
After further investigation and few tricks (that won’t be revealed in this article) I‘ve managed to utilize Strobe Utility overdrive gain slider in sample & hold mode and compare to factory gains. I can confirm these values are very close to accurate:
- Standard = 0/100
- Advanced ≈ 8/100
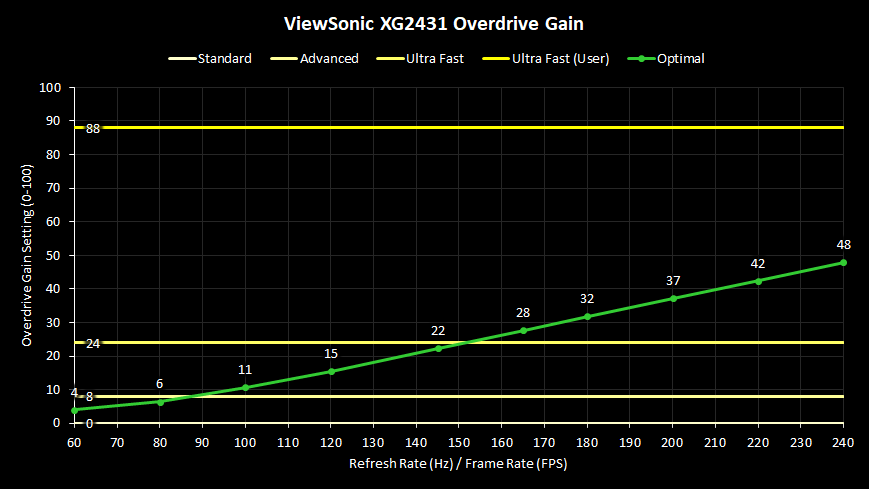
- Ultra Fast ≈ 24/100, Ultra Fast (User) ≈ 88/100
As we’ve seen from PureXP charts, optimal gain for 240 Hz is ~48, which sits almost exactly between Ultra Fast and bugged Ultra Fast. This is not ideal for those who plan to use just ~240 Hz fps. Here is a nice chart for demonstration. Everything above “Optimal” green line (ideal variable overdrive) means noticeable overshoot.
Overdrive Gain across the range
If we had the ability to choose a finer gain setting, we could improve GtG performance. Not just at 240 Hz, but across other refresh rates too. Here’s how custom OD 48 stacks up against Ultra Fast (Native) at 240 Hz. Not a night and day difference but still there. Faster moving speeds nicely amplify the difference.