

 Introduction
Written by Mark D. Rejhon. Updated 2017.
Pursuit camera are used by display manufacturers for display testing (e.g. MotionMaster, and other MPRT pursuit cameras). This is a camera that follows on-screen motion. These cameras are extremely accurate at measuring motion blur & other artifacts, including ghosting and overdrive artifacts.
- UPDATE: There’s a new Pursuit Camera Introduction, thanks to a new 2019 LinusTechTips video!
- UPDATE2: New Pursuit Camera Discussion Forum, with an easy smartphone pursuit camera HOWTO!
Blur Busters has invented an inexpensive method of photographing display motion blur accurately with an off-the-shelf camera on a sliding rail:
There is a peer reviewed conference paper (ResearchGate) that I co-authored with Nokia and NIST.gov researchers, on this technique! The paper confirms that testing technique successfully inexpensively achives accuracy previously only accessible by high-priced setups! Several review websites including RTings, TFT Central, HDTVtest.co.uk, LinusTechTips, and others have started using this technique which you can easily build and do yourself for free using your existing point-and-shoot camera.
- RTings has made an excellent video of this pursuit camera technique.
Most consumer digital cameras can successfully be used as a pursuit camera, with this technique. This technique was used to take the pictures for the LCD Motion Artifacts 101: Introduction page, the LCD Motion Artifacts: Overdrive page, and the 60Hz versus 120Hz versus LightBoost page.
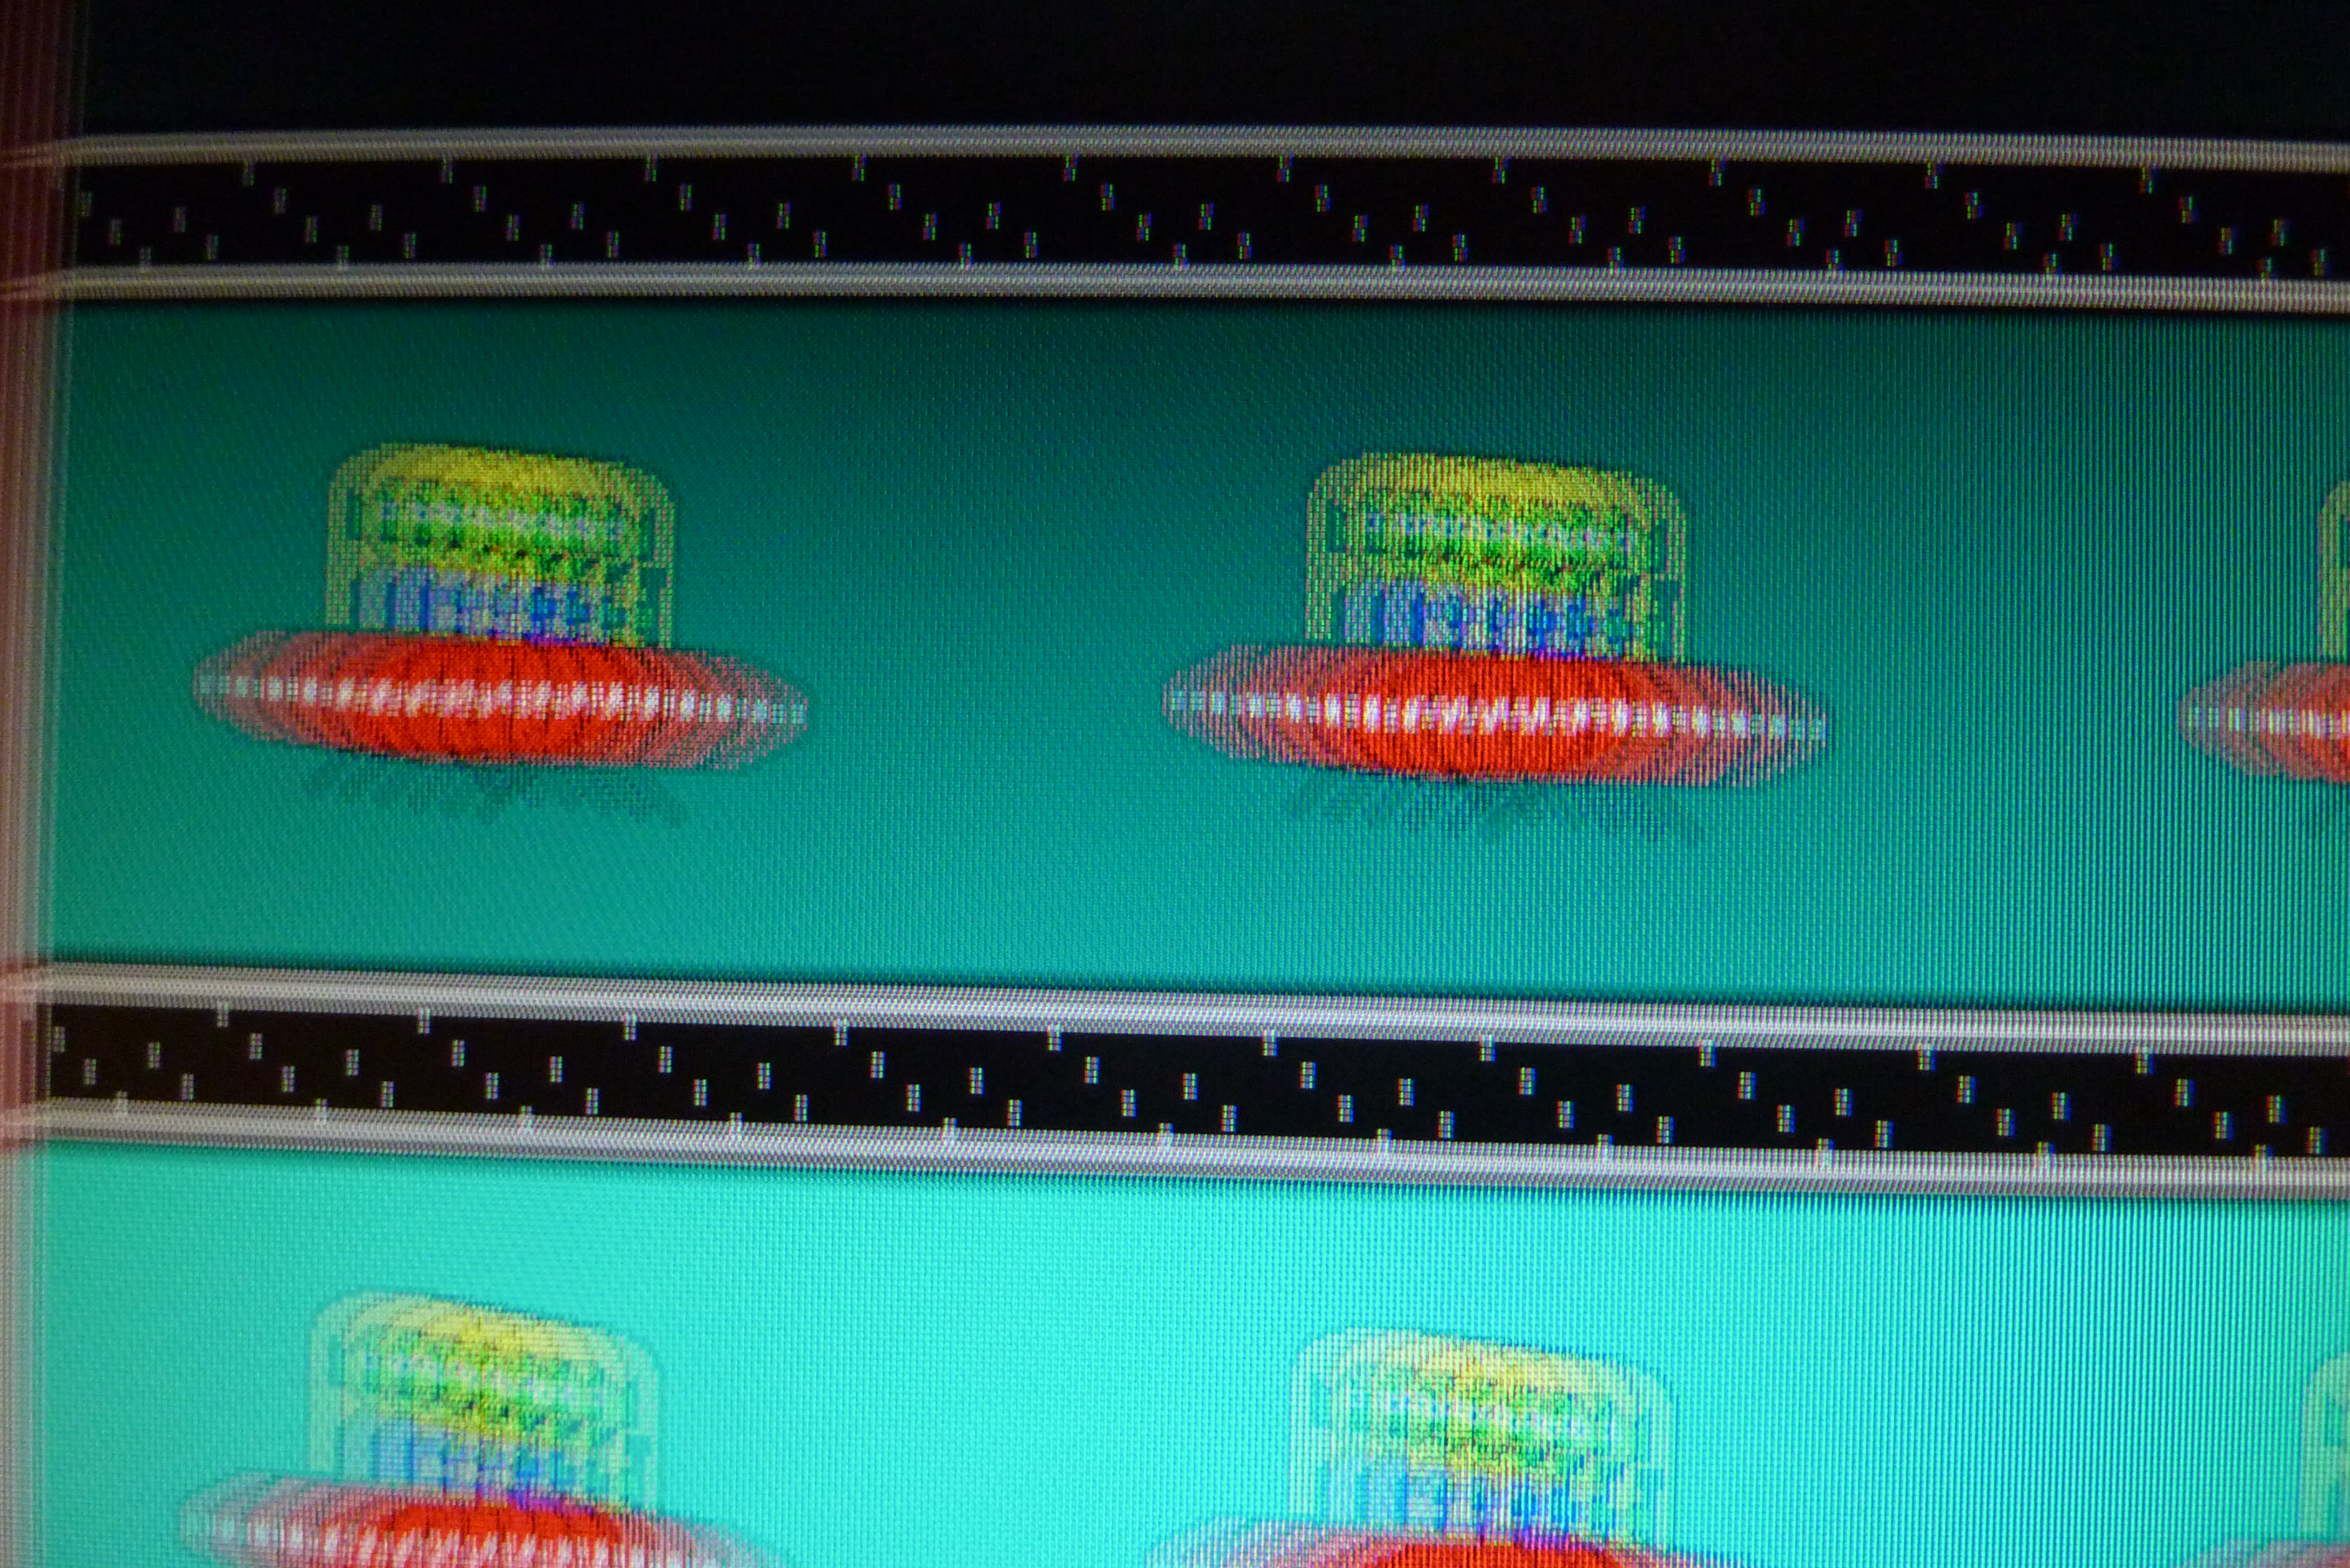
 at left edges of this horizontally moving UFO.")
Example pursuit camera capture of overdrive artifacts (left edges)
The Blur Busters Invention
The Blur Busters Motion Tests (www.testufo.com) is a 100% web based motion test that run in new HTML5 browsers with perfect VSYNC support.
To make it possible to use inexpensive off-the-shelf camera (with a common camera slider/rail) as a suitable pursuit camera for display motion blur measurement, Mark Rejhon of Blur Busters invented the technique of embedding pursuit camera tracking accuracy data into pursuit camera photographs. This is the temporal pattern shown in “Pursuit Camera Sync Track” (photographs shown below — scroll down), which makes pursuit camera photography easy, affordable and blogger accessible! This allows you to recognize when the pursuit camera capture succeeded, simply by analyzing the photographs.
These ultra-precise HTML5 motion tests works best in Google Chrome as it reliably runs 120fps@120Hz with VSYNC enabled. Several other web browsers also now support refresh-synchronized animations (web browsers that support VSYNC). Web browsers that support ultra-precise animations during all refresh rates include Chrome 18+, FireFox 24+ Beta, Opera 15+, and Safari 6+. For refresh rates 100Hz or less, Internet Explorer 10+ is also suitable. Close all background applications and close other browser windows/tabs. Give TestUFO 100% CPU for fully refresh-rate synchronized motion with zero stutters.
Instructions
First, get familiar with the Ghosting Test on TestUFO. Click Ghosting Test with Sync Track, or follow these steps:
1. Go to www.testufo.com and select “Ghosting” at upper-right.
2. Set UFO spacing to 150.
3. Enable “Pursuit Camera Sync Track”
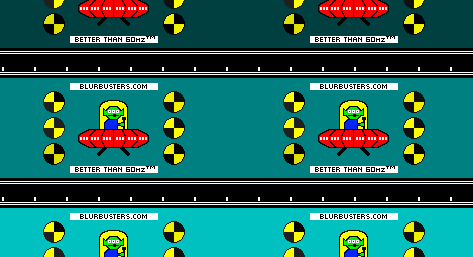
You will observe the Pursuit Camera Sync Track looks like a horizontal ladder if your eyes are tracking the moving object. The Sync Track becomes “broken” when you are not tracking your eyes on the moving objects. This also happens when taking camera exposures. To set up an inexpensive pursuit camera involves the following:
- Purchase a Camera Rail (Amazon) – We recommend a rail about 25% wider than the display you test, in order to permit camera acceleration/deceleration room. A great general-purpose rail is the IMORDEN 40″ (100cm) camera slider rail utilizing ball bearings for less than $100 USD! You need a very stable, firm, low-rattle rail.
Thanks to the invention of being able to verify tracking accuracy just by analyzing embedded tracking-accuracy data (“sync track”), you can simply use manual hand-propelled camera rails. There are other inexpensive methods that were also found to work:
– It is possible to try hand-panning the camera for during quick tests, but it is much more difficult to get barely acceptable tracking accuracy, after many passes.
– A home-made wheeled dolly can work with sufficient accuracy (Suggestion: low friction roller blade wheels, on a mini dolly sitting on a table, along a low-friction guide track).
– Camera on a low-friction block, sliding on a low-friction surface (e.g. teflon or lubricated surface) along a low-friction guide. Tests were done on a method similiar to this, and it occasionally achieved a good tracking accuracy of <~1 pixel during 960 pixels/sec on small monitors over a 1/30sec timescale, when doing 20 passes.
– Using the automatic burst shooting mode of your camera, can also help. It is very easy to visually identify which photos has good tracking accuracy.
– For lower-quality but quick results, even hand-pursuits using handheld iPhone/Video (rail-less operation) can produce acceptable results. Use manual focus/exposure/white balance. Use a good frame stepping video player on the result, and then save the best freeze-frame. - Get a digital camera, preferably with controllable exposure speed. Controllable exposure is preferable, though you can use any other cheap point-and-shoot camera too, even an iPhone camera, as long as it can cover a few monitor refresh cycles (but not too many). Casio EX-FC200S and EX-ZR200 also do high-speed 480fps and 1000fps video
- Mount the camera on the camera rail (or other sideways sliding/rolling mechanism).
- Adjust the resistance of camera rail to allow the camera to slide sideways as low-resistance as possible, without camera rattle. Use a small amount of silicone lubricant, if necessary for low-resistance sliding.
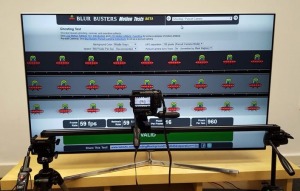
- Put the camera rail assembly in front of your monitor to test. Lower your monitor as low as it can go. Raise the camera rail assembly (e.g. wood blocks) to match the level of the center of your screen. Make the rail as parallel as possible to the screen’s surface (very important for accuracy!). Make sure the camera rail assembly does not slide around (e.g. use vises, use heavy weights, bolt down)
- Set the camera exposure to 4 times the length of the monitor refresh. For 120Hz, use a 1/30sec camera exposure. You can also use even longer exposures, once you become familiar with interpreting the Sync Track (or writing software that processes the photographs).
- NOTE: Stacking multiple refreshes into one camera exposure, improves the WYSIWYG accuracy of pursuit camera photographs, since it more closely simulates the continual sampling (“integration”) the human eye does while seeing. Stacking multiple refreshes also filters out high-speed temporal effects of certain displays (e.g. plasma subfields, temporal dithering, etc.) and far more closely resembles the average perceived motion blur that the human eye sees. In addition, multiple-refresh stacking also eliminates visible errors caused by camera shutter timing being out of phase with refresh timing. You may use a longer exposure (e.g. 1/10sec) to capture more than 4 refreshes, but this makes it harder to verify the correctness of the Pursuit Camera Sync Track since it is currently optimized to 4 refreshes.
- Load the Ghosting test pattern with the Pursuit Camera Sync Track. Maximize the browser window.
- Pre-position the camera to point at the leftmost edge of the computer monitor, with the lens pointed at an angle that is as square as possible to the screen surface.
- Slide the camera sideways, to the right, at the same speed as on-screen motion, while pressing the shutter button. Keep the camera moving consistently while taking a photo (or holding the shutter button down, for burst shooting mode).
- Repeat steps 8-9 until the Sync Track looks like a horizontal ladder.
It may take a few attempts before you capture a pursuit camera photo accurately.
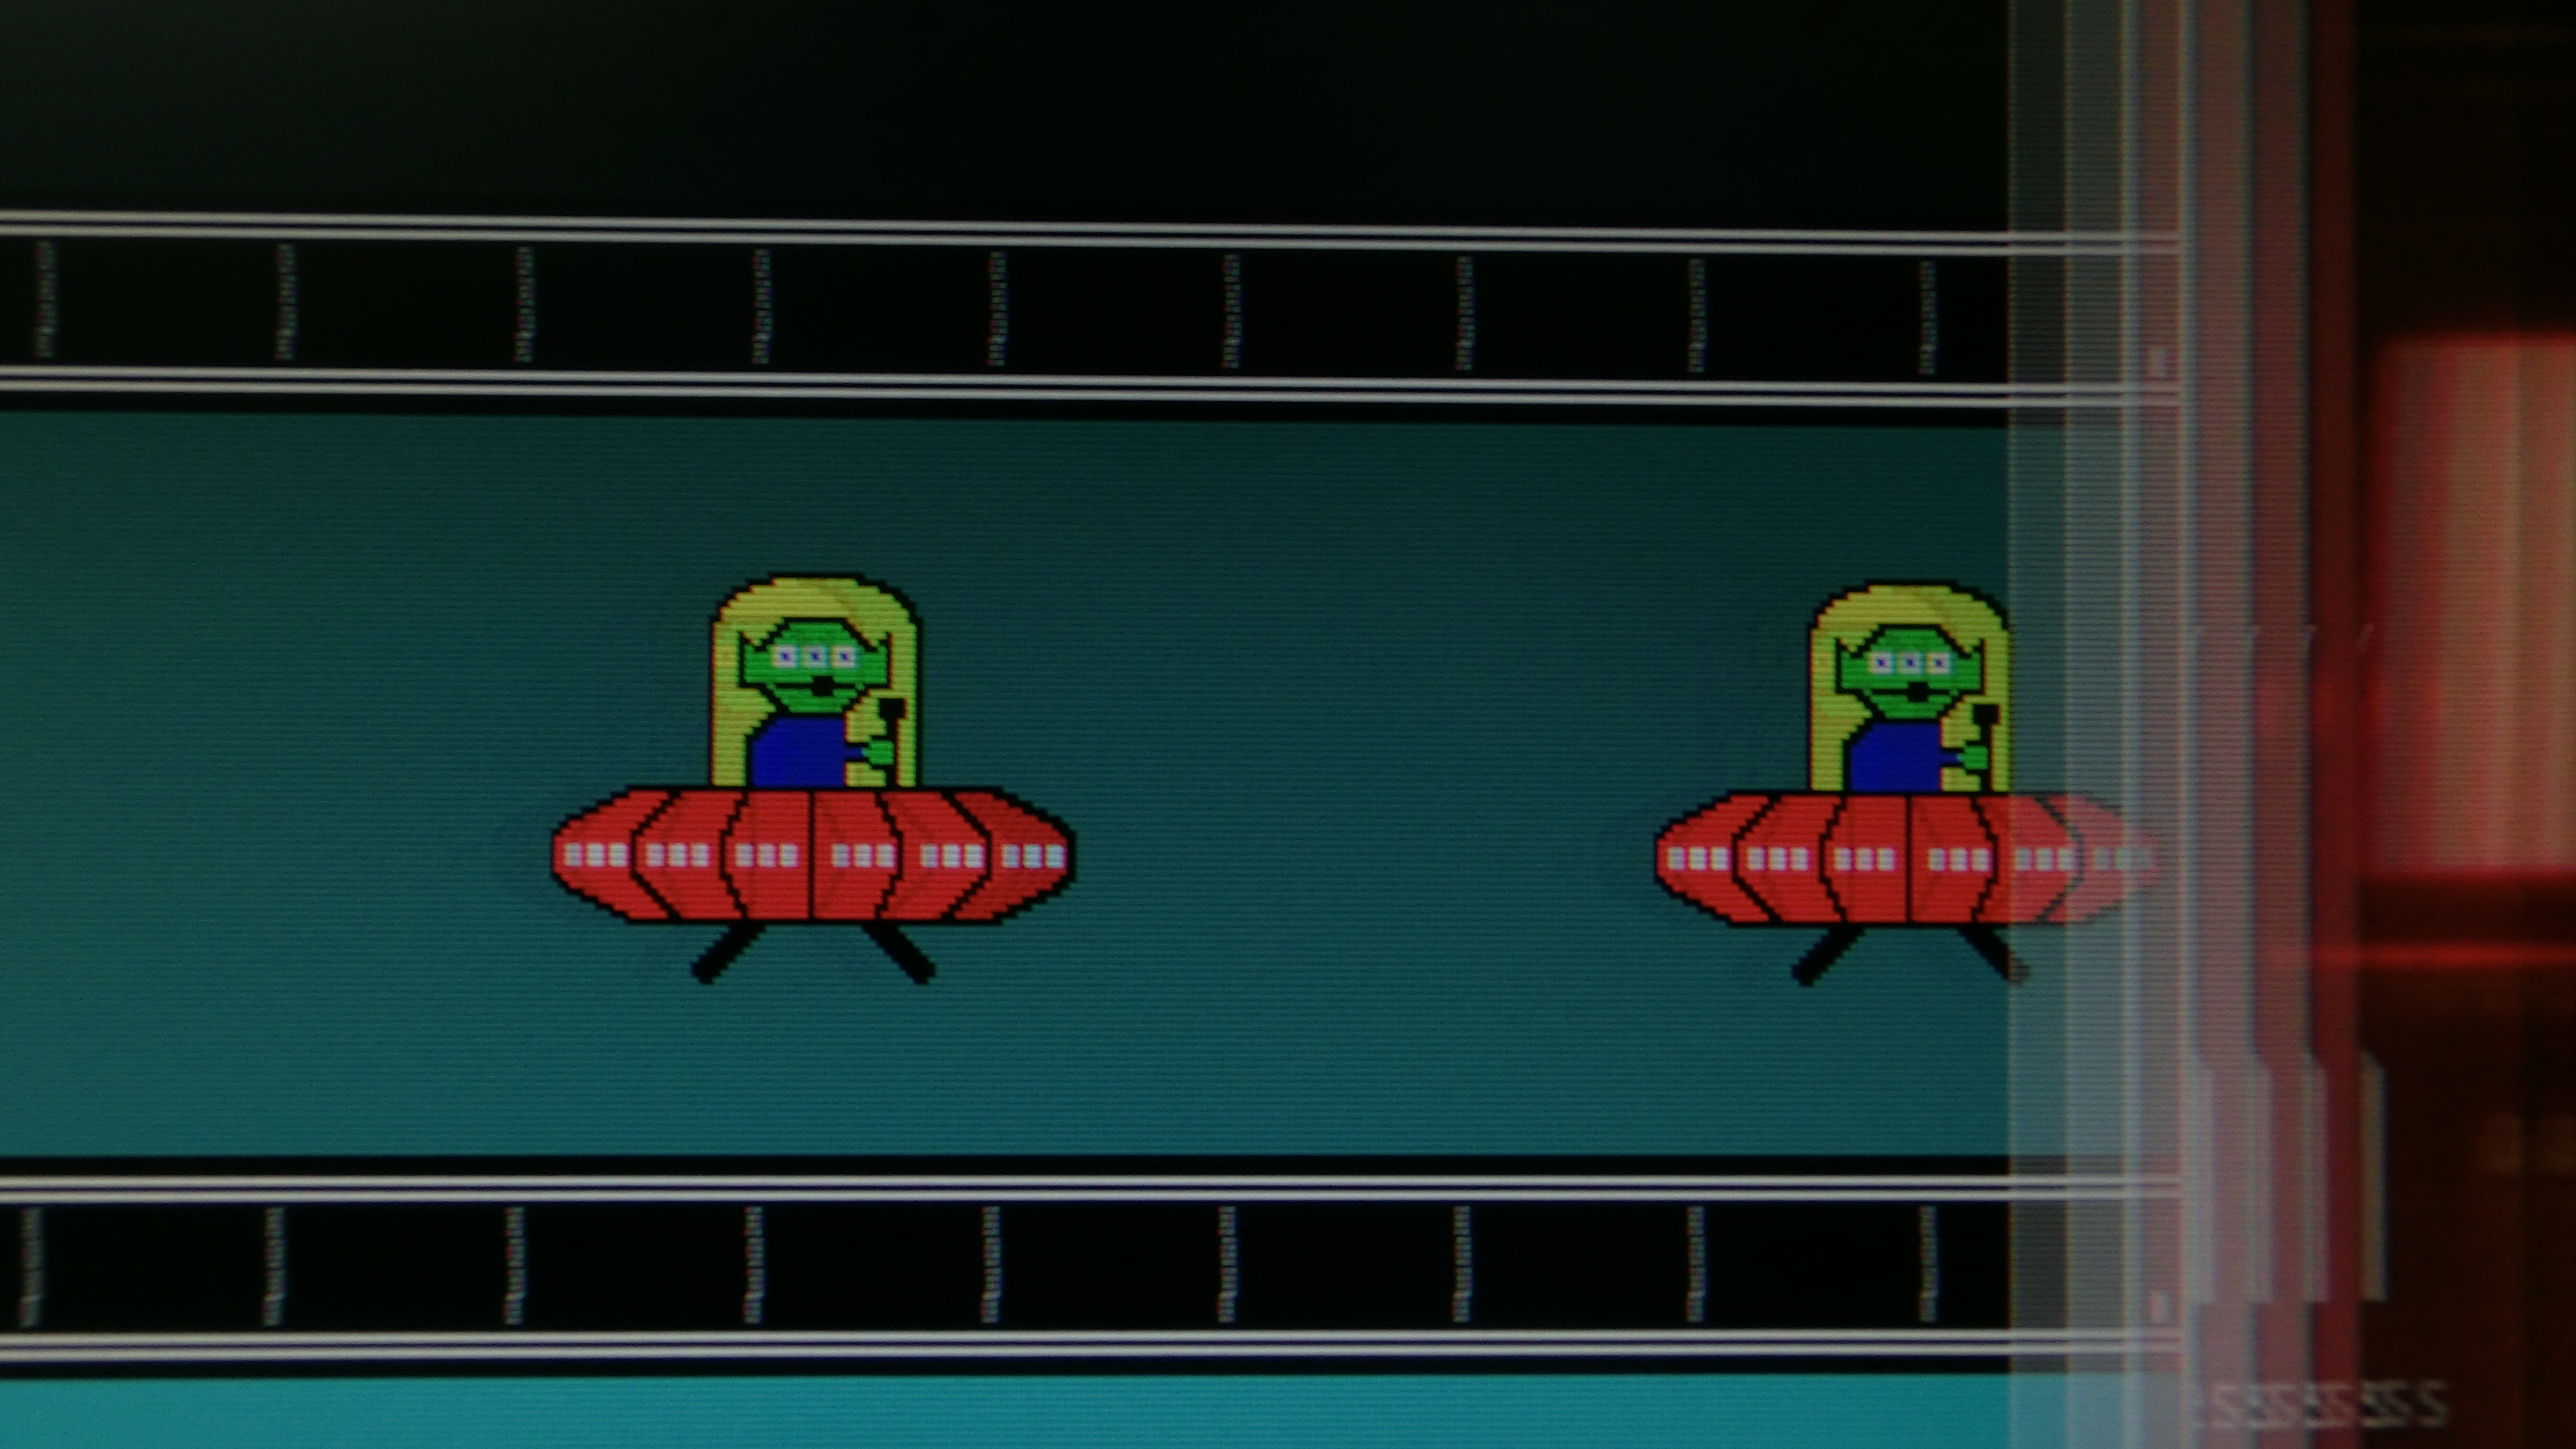
When done accurately, the Sync Track is successfully captured as follows:
Successful pursuit camera photograph (LightBoost)
Camera Tracking Accuracy: Verification of Vertical Accuracy
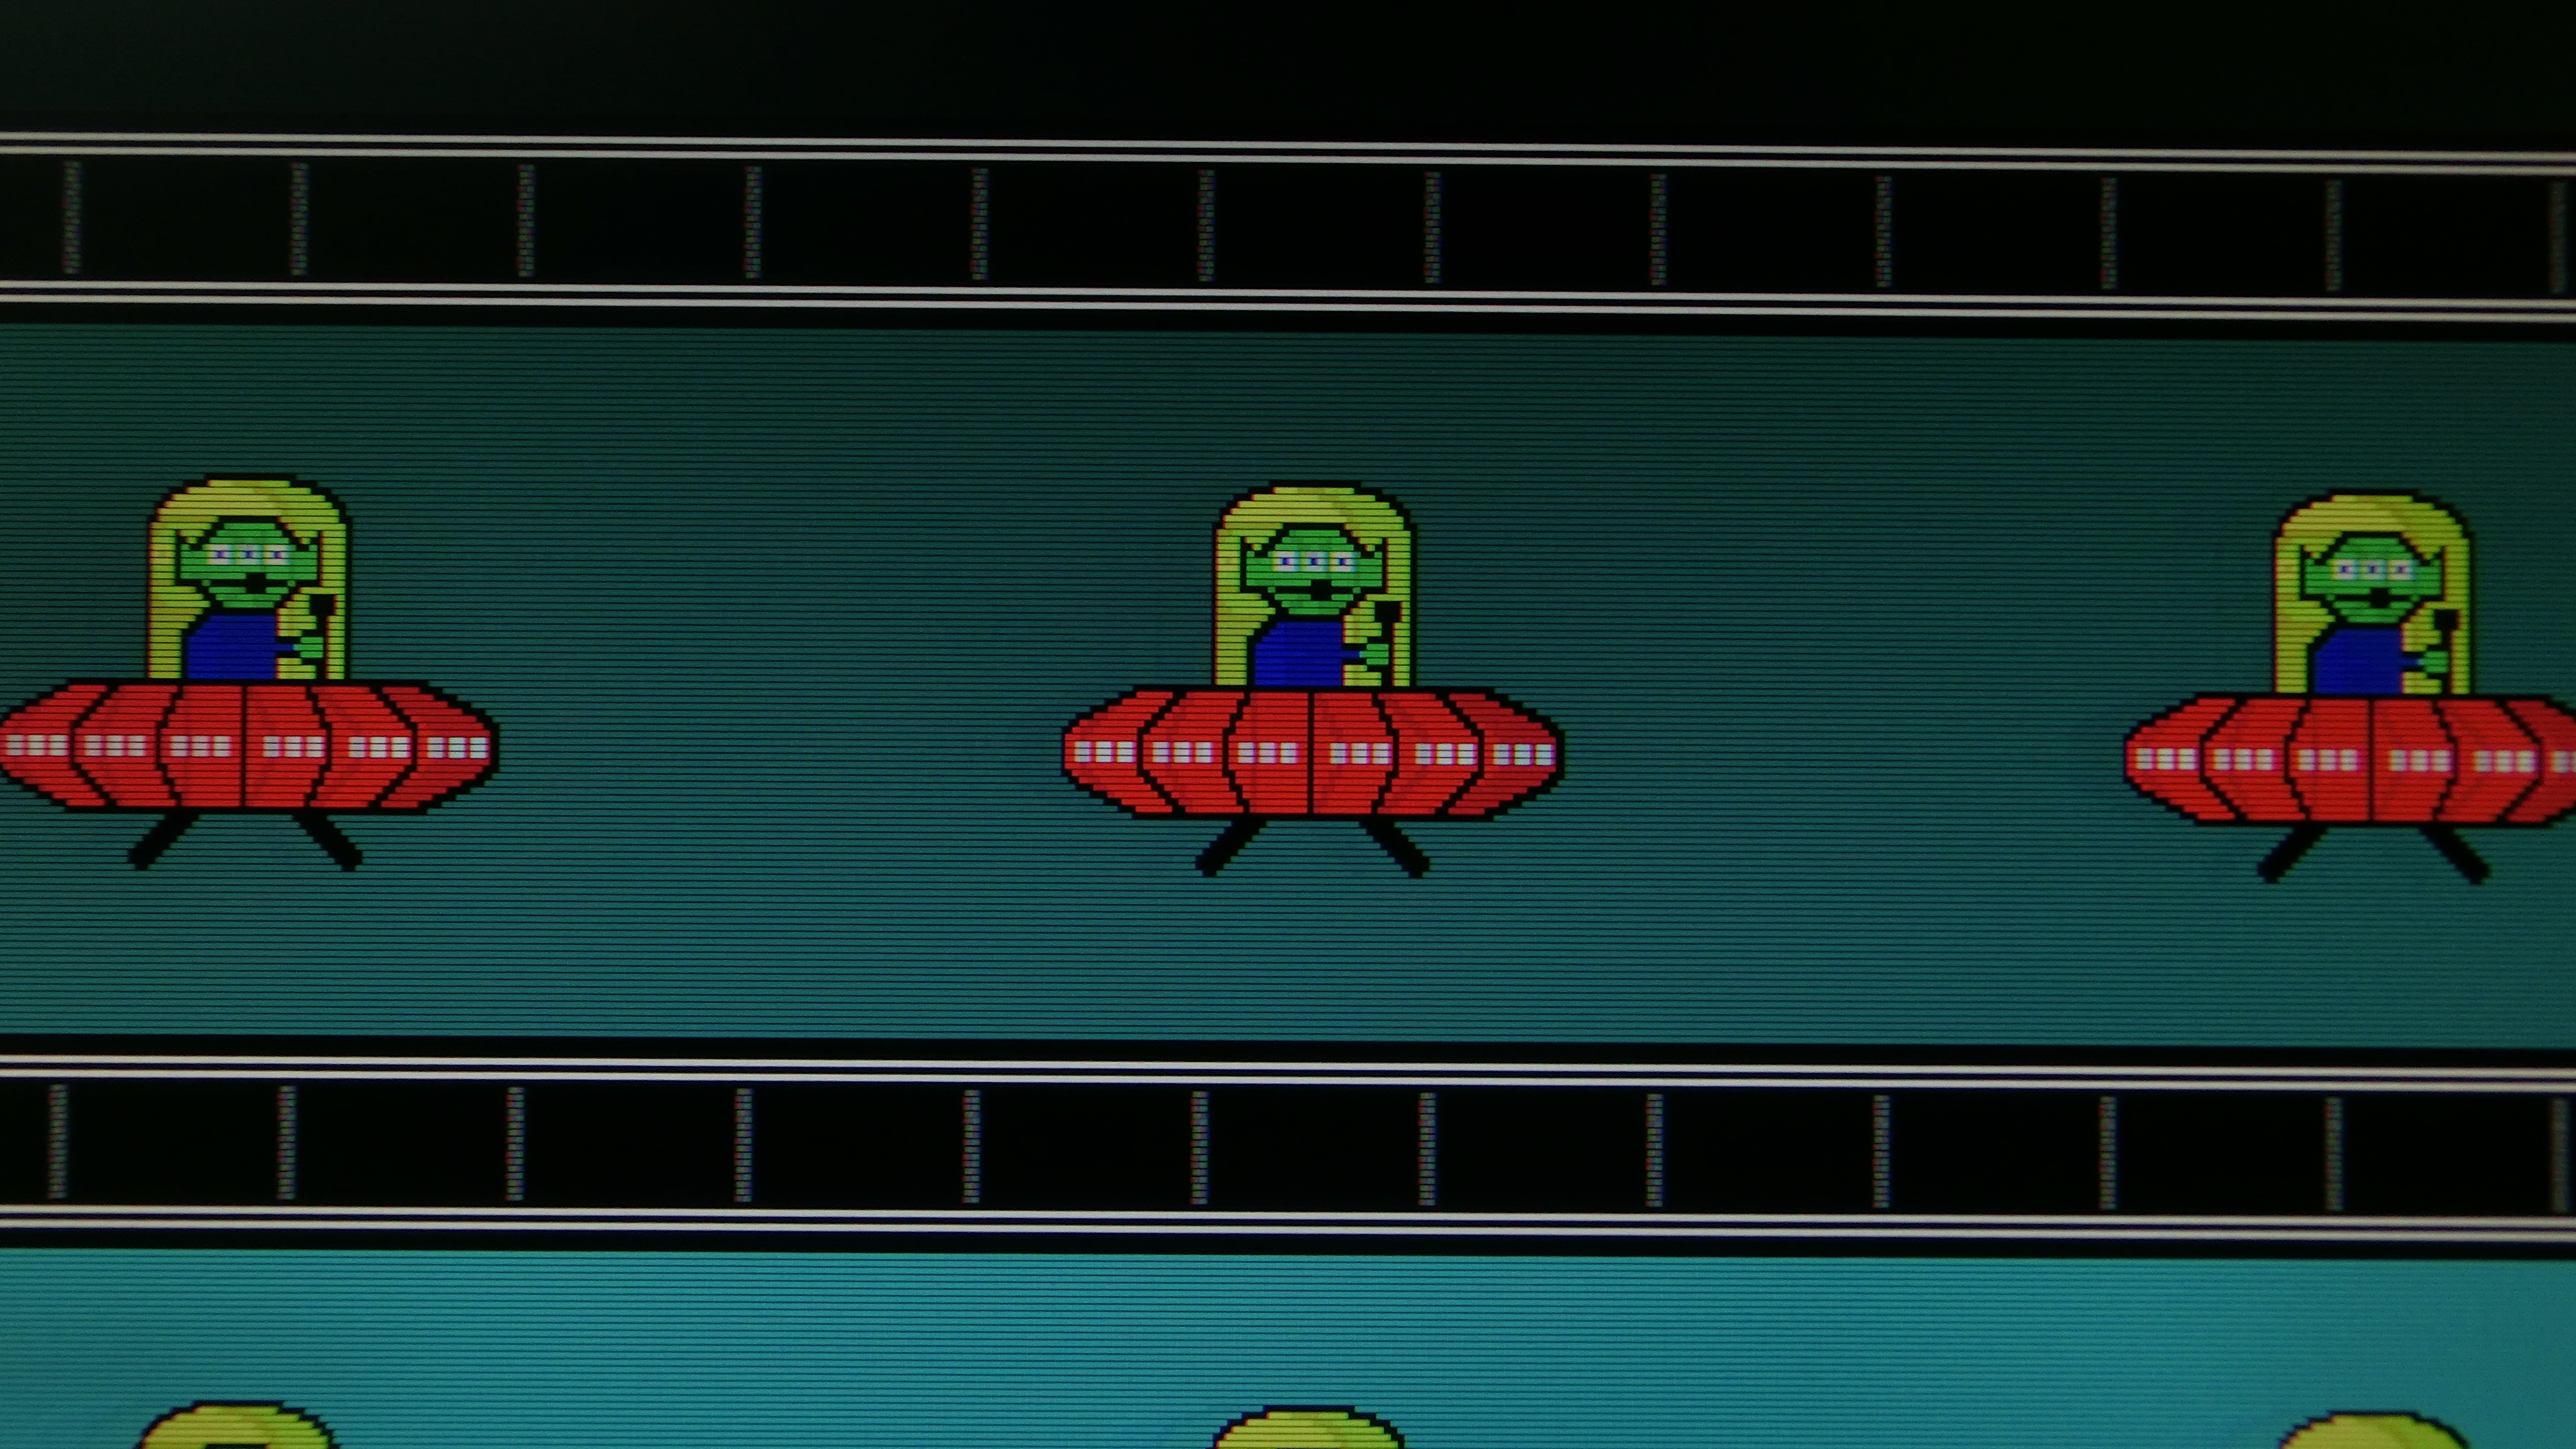
There must be a clear 1-pixel black gap inside the fine horizontal white lines.
This verifies your camera didn’t shake vertically (e.g. camera vibrations).
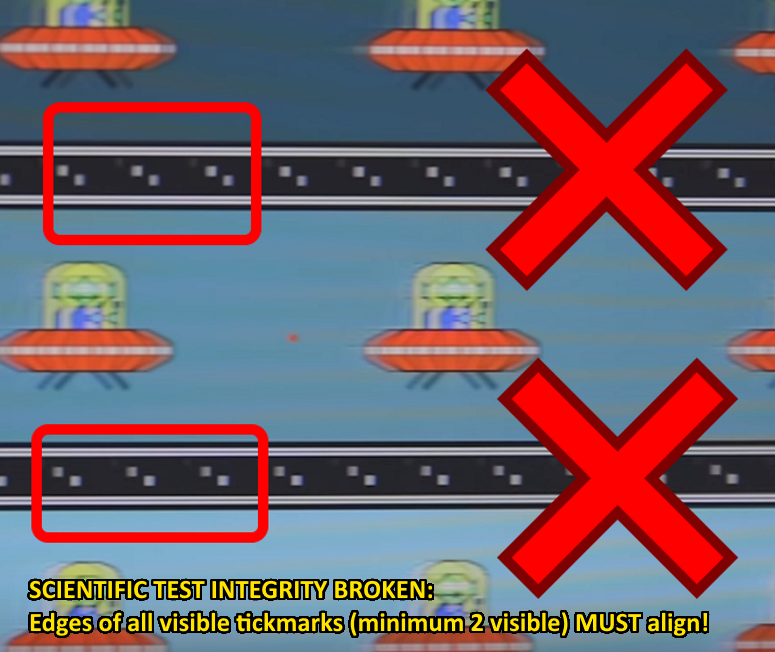
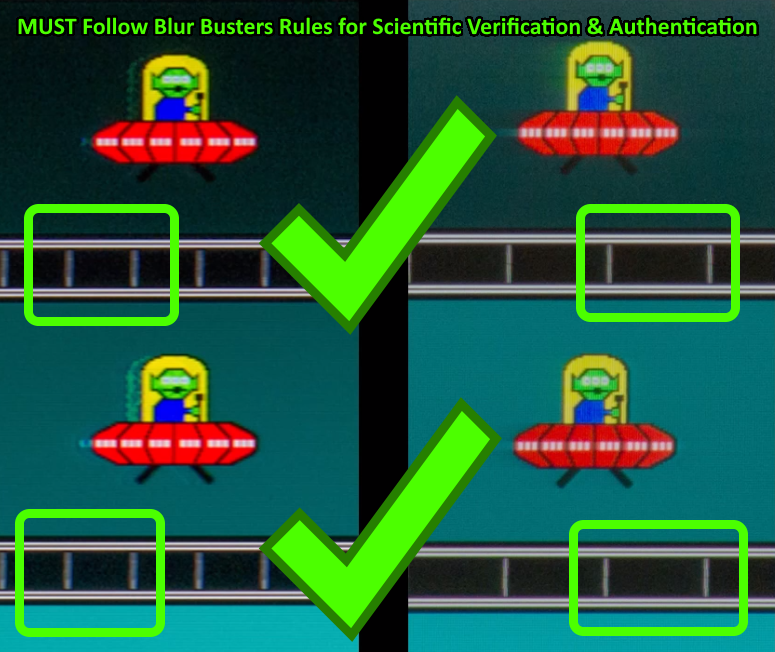
Camera Tracking Accuracy: Verification of Horizontal Accuracy
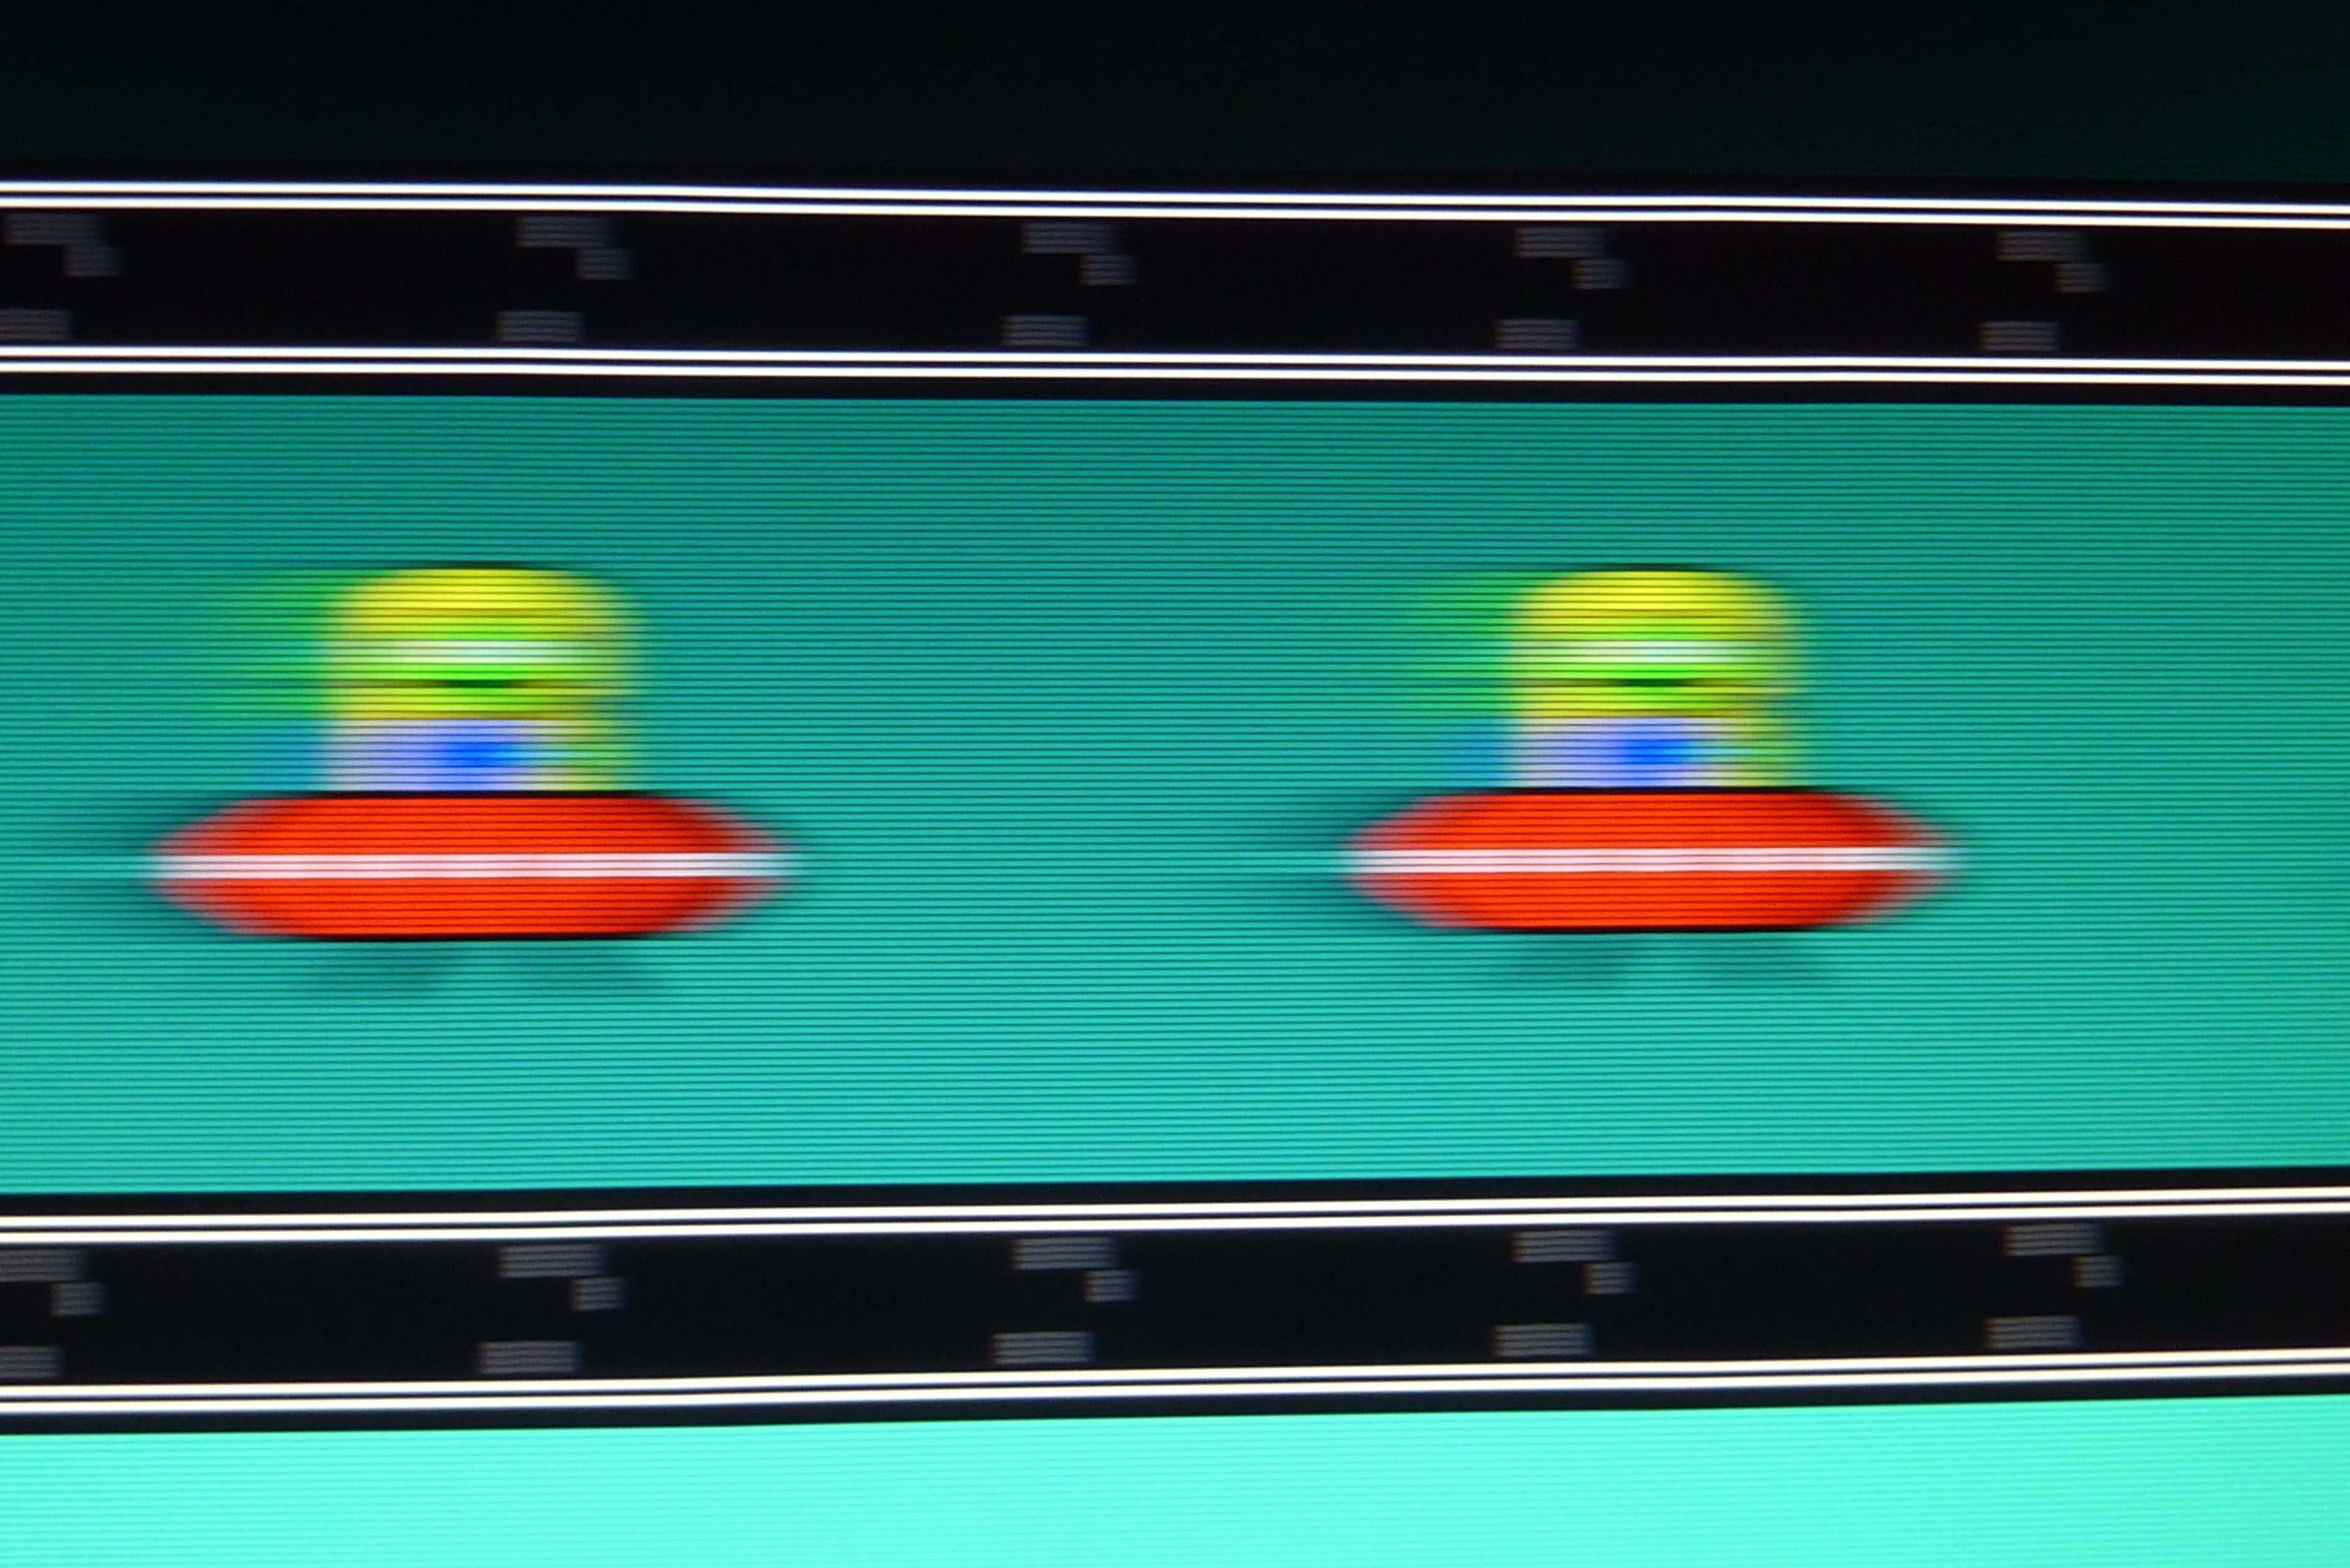
If your pursuit camera photograph is not successful, then it is easy to identify the flaws. As a general rule of thumb, motion flaws are visually identifiable as follows:
Artifacts That Invalidates Results (adds unwanted motion blur)
- Broken vertical lines: camera was not moving near correct speed
- Vertical lines slants backwards (\): camera moved too slow horizontally
- Vertical lines slants forward (/): camera moved too fast horizontally
- Wavy/curved vertical lines: camera moved horizontally at a varying speed
- Sync Tracks not consistent (left/right edges, or different sync tracks): camera was rotating/skewing/tilting while tracking.
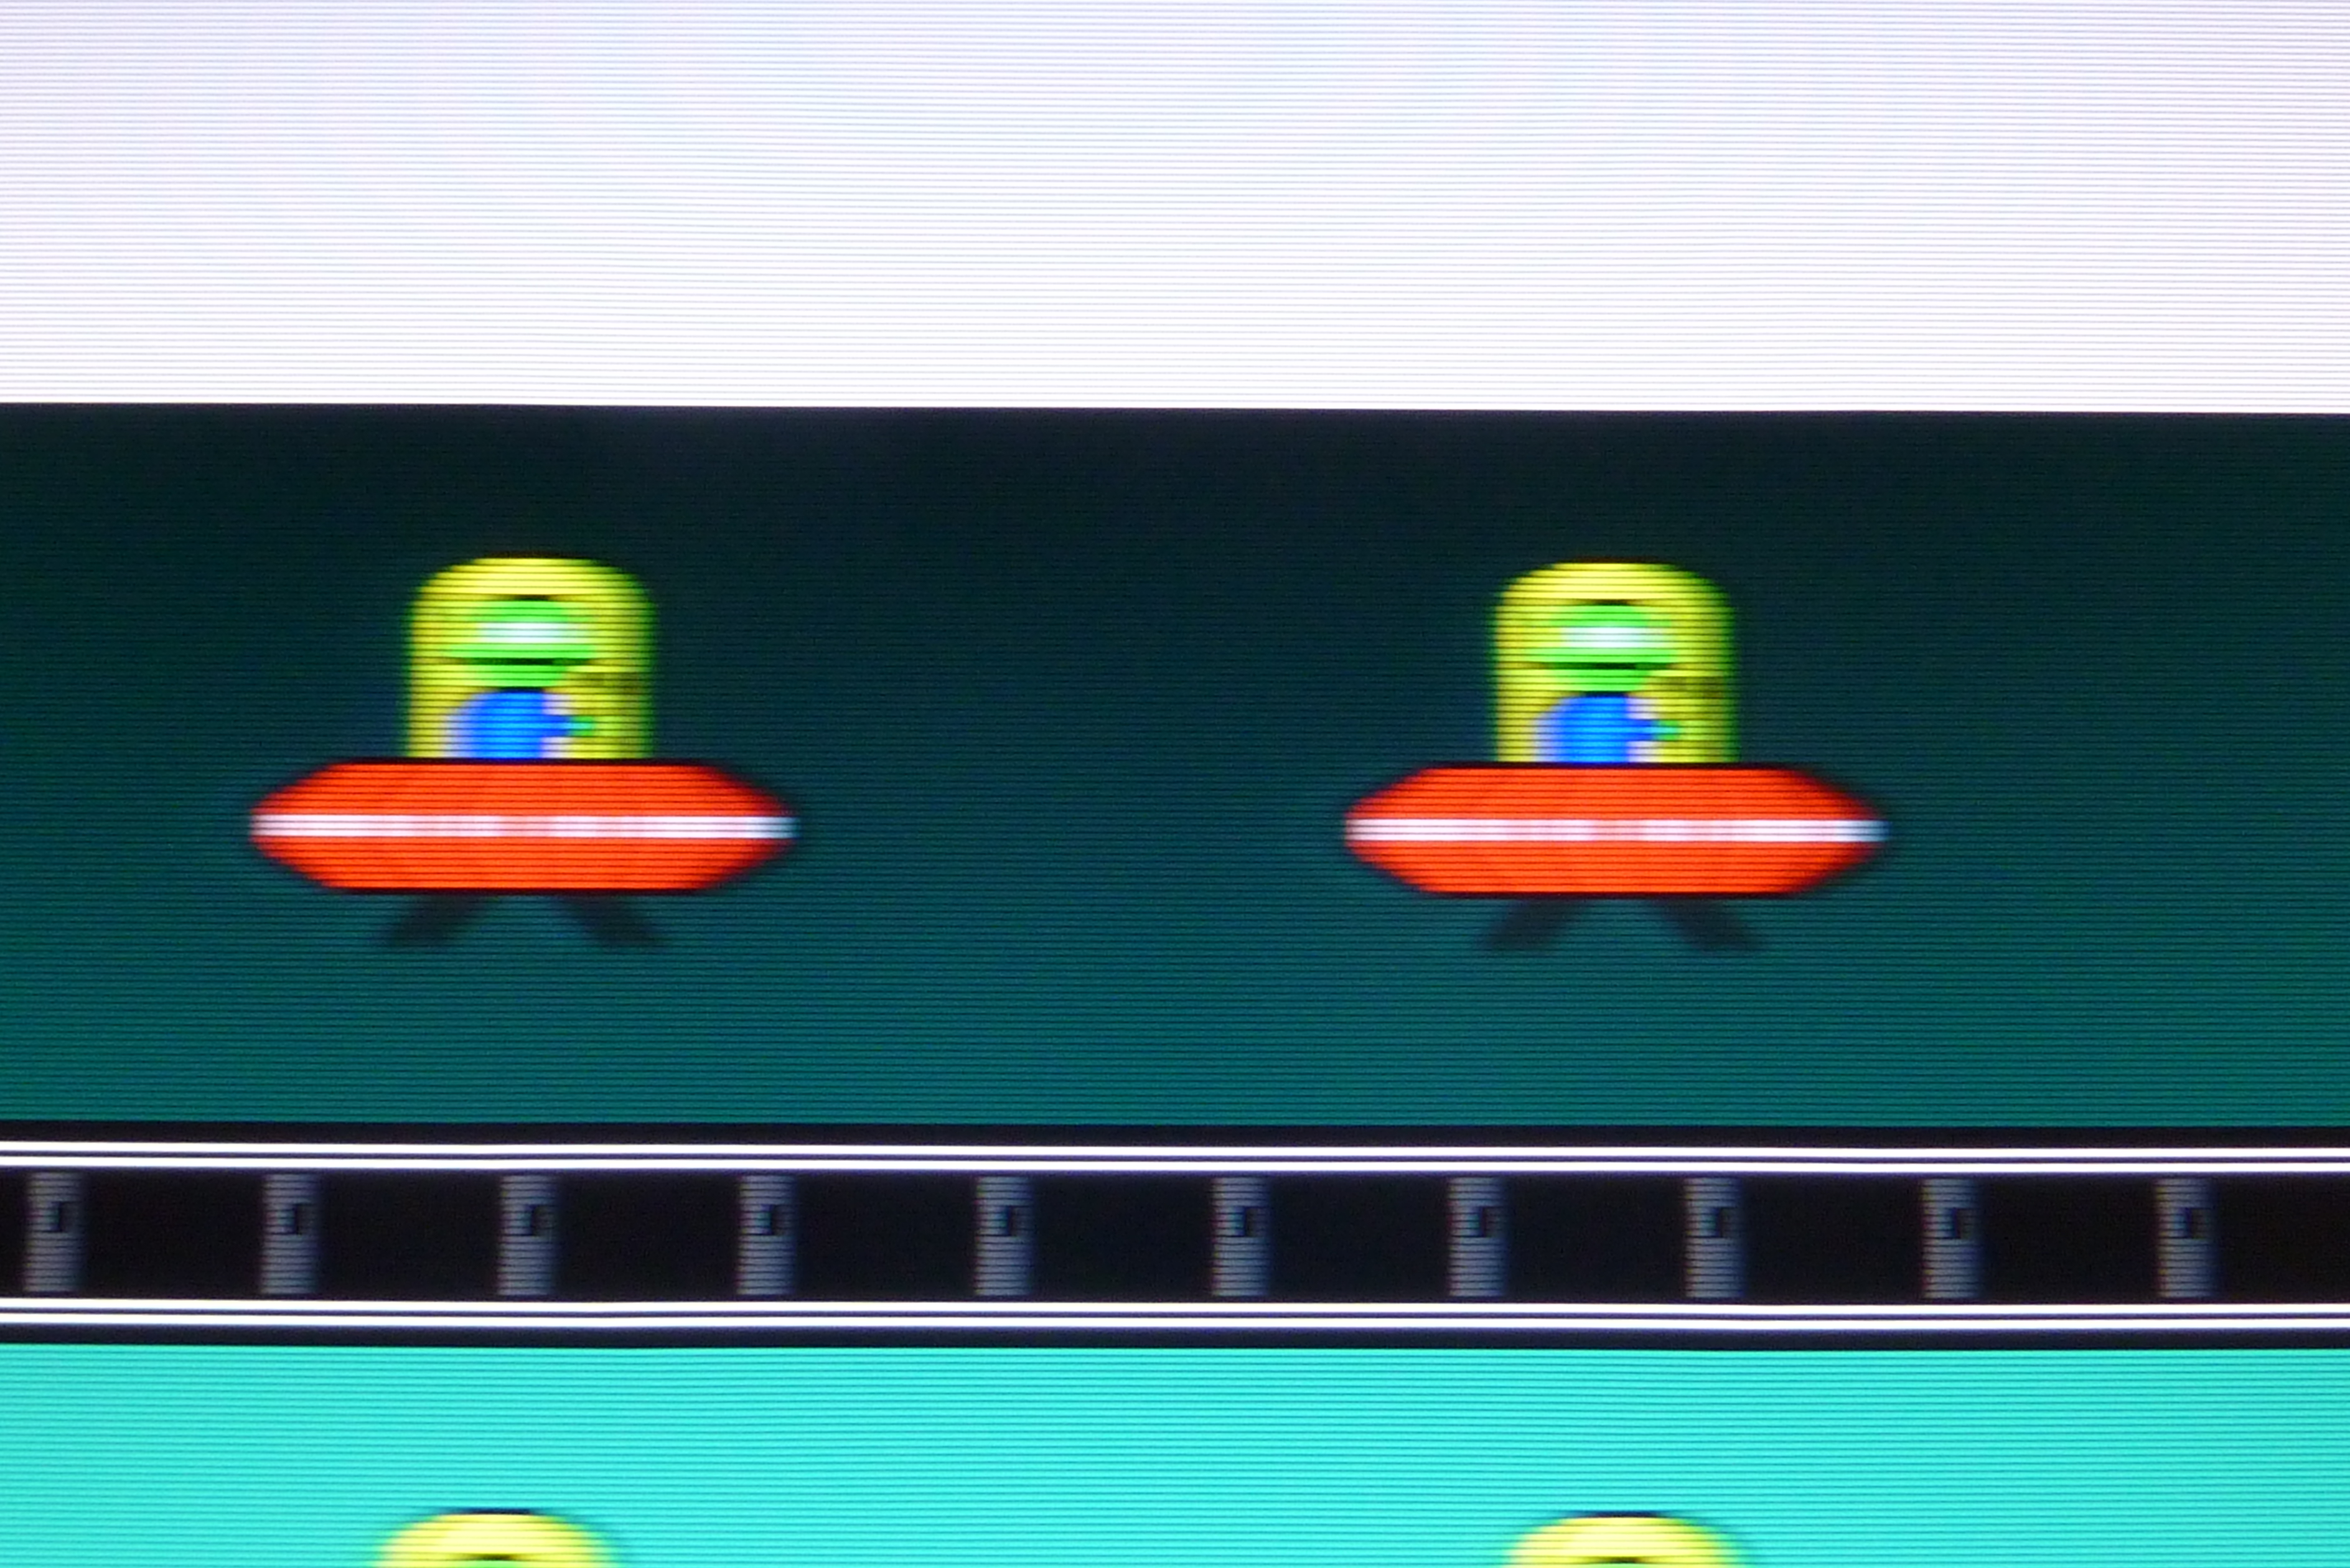
Artifacts That Don’t Invalidate Results (results valid if vertical segments are aligned)
- Missing portions in lines: exposure was less than 4x refresh
- Segments of lines is brighter: exposure was greater than 4x refresh
- Thick vertical bars: lower refresh rates & sample-and-hold displays
- Thin vertical lines: higher refresh rates & strobe displays such as LightBoost
- Noisy vertical lines: temporal dithering (plasma, DLP, some LCD’s)
Tilted/skewed photographs:
- Tilted/skewed photographs are generally still valid results. This occurs if the the camera orientation is not aligned to screen plane (e.g. tilted or mis-pointed camera). However, this actually does not interfere with photographed motion blur, as long as the camera orientation remained constant, the camera rail is parallel to the screen plane, and the camera moved parallel to the screen plane. A quadrilateral reshape/stretching tool can correct the photograph aligment, using strategic positions within the Sync Track (as calibration points) to mark the four corners. Ensure that the resulting corrected image have evenly-spaced Sync Track markings (no non-linearities). Avoid the use of inexpensive cameras (e.g. cameraphones) since they have noticeably slow scanout that can add error (as unwanted tilt, like a rolling shutter) to pursuit camera photographs.
Examples of Artifacts in Pursuit Camera Photography:
Verifying Tracking Errors
Pursuit camera photography on LightBoost displays
Broken vertical lines: camera was not moving near near correct speed
Vertical lines slants forward (/): camera moved too fast horizontally
Vertical lines slants backwards (\): camera moved too slow horizontally
Vertical lines slants backwards (\): camera moved too slow horizontally
This one is a 1/20sec exposure, that actually overlapped 7 refreshes of 120Hz
(e.g. 1/4ths of first refresh, then 5 full refreshes, then 3/4ths of final refresh)

Segments of lines is brighter: This specific exposure captured 5 refreshes.
This photograph is valid.
Overshooting the edge of the web browser: whoops!
Try again with a maximized browser window.
Also, camera was slightly vibrating vertically; creating small disjoints in the vertical line.
Excellent Pursuit Camera Capture: Sync Track is extremely clear.
An amazing 1/10th pixel error margin, with a 1/30 second exposure.
(Yes, this is a hand-driven pursuit camera, sliding sideways at ~0.25 meters/second!)
This is also a LightBoost monitor, with the LightBoost setting configured to 10%.
Pursuit camera photography on traditional LCD displays (non-LightBoost):
Broken vertical lines: camera was not moving near near correct speed
& Missing portions in lines:exposure was less than 4x refresh
This photo is invalidated by the broken vertical lines.
Missing portions in lines: exposure was slightly less than 4x refresh
This photograph is valid. That said, due to slight sub-pixel-size misalignments within vertical lines, there is approximately one-third pixel error in camera tracking accuracy.
![]()
Minor Alignment Errors: slight inaccuracies in camera tracking.
This photograph is still useful. Approximately one pixel error in camera tracking accuracy, due to misalignments within the vertical lines (bars).
—
For a video of a pursuit camera in action, see RTING’s pursuit camera video on YouTube.
Easter Egg Tip: The Blur Busters “MPRT” test and the “Moving Photo” test now have a secret Pursuit Camera Sync Track built into them. Use these special links:
– TestUFO Moving Photo Test (with Temporal Grid)
– TestUFO Moving Picture Response Time (with Sync Track)
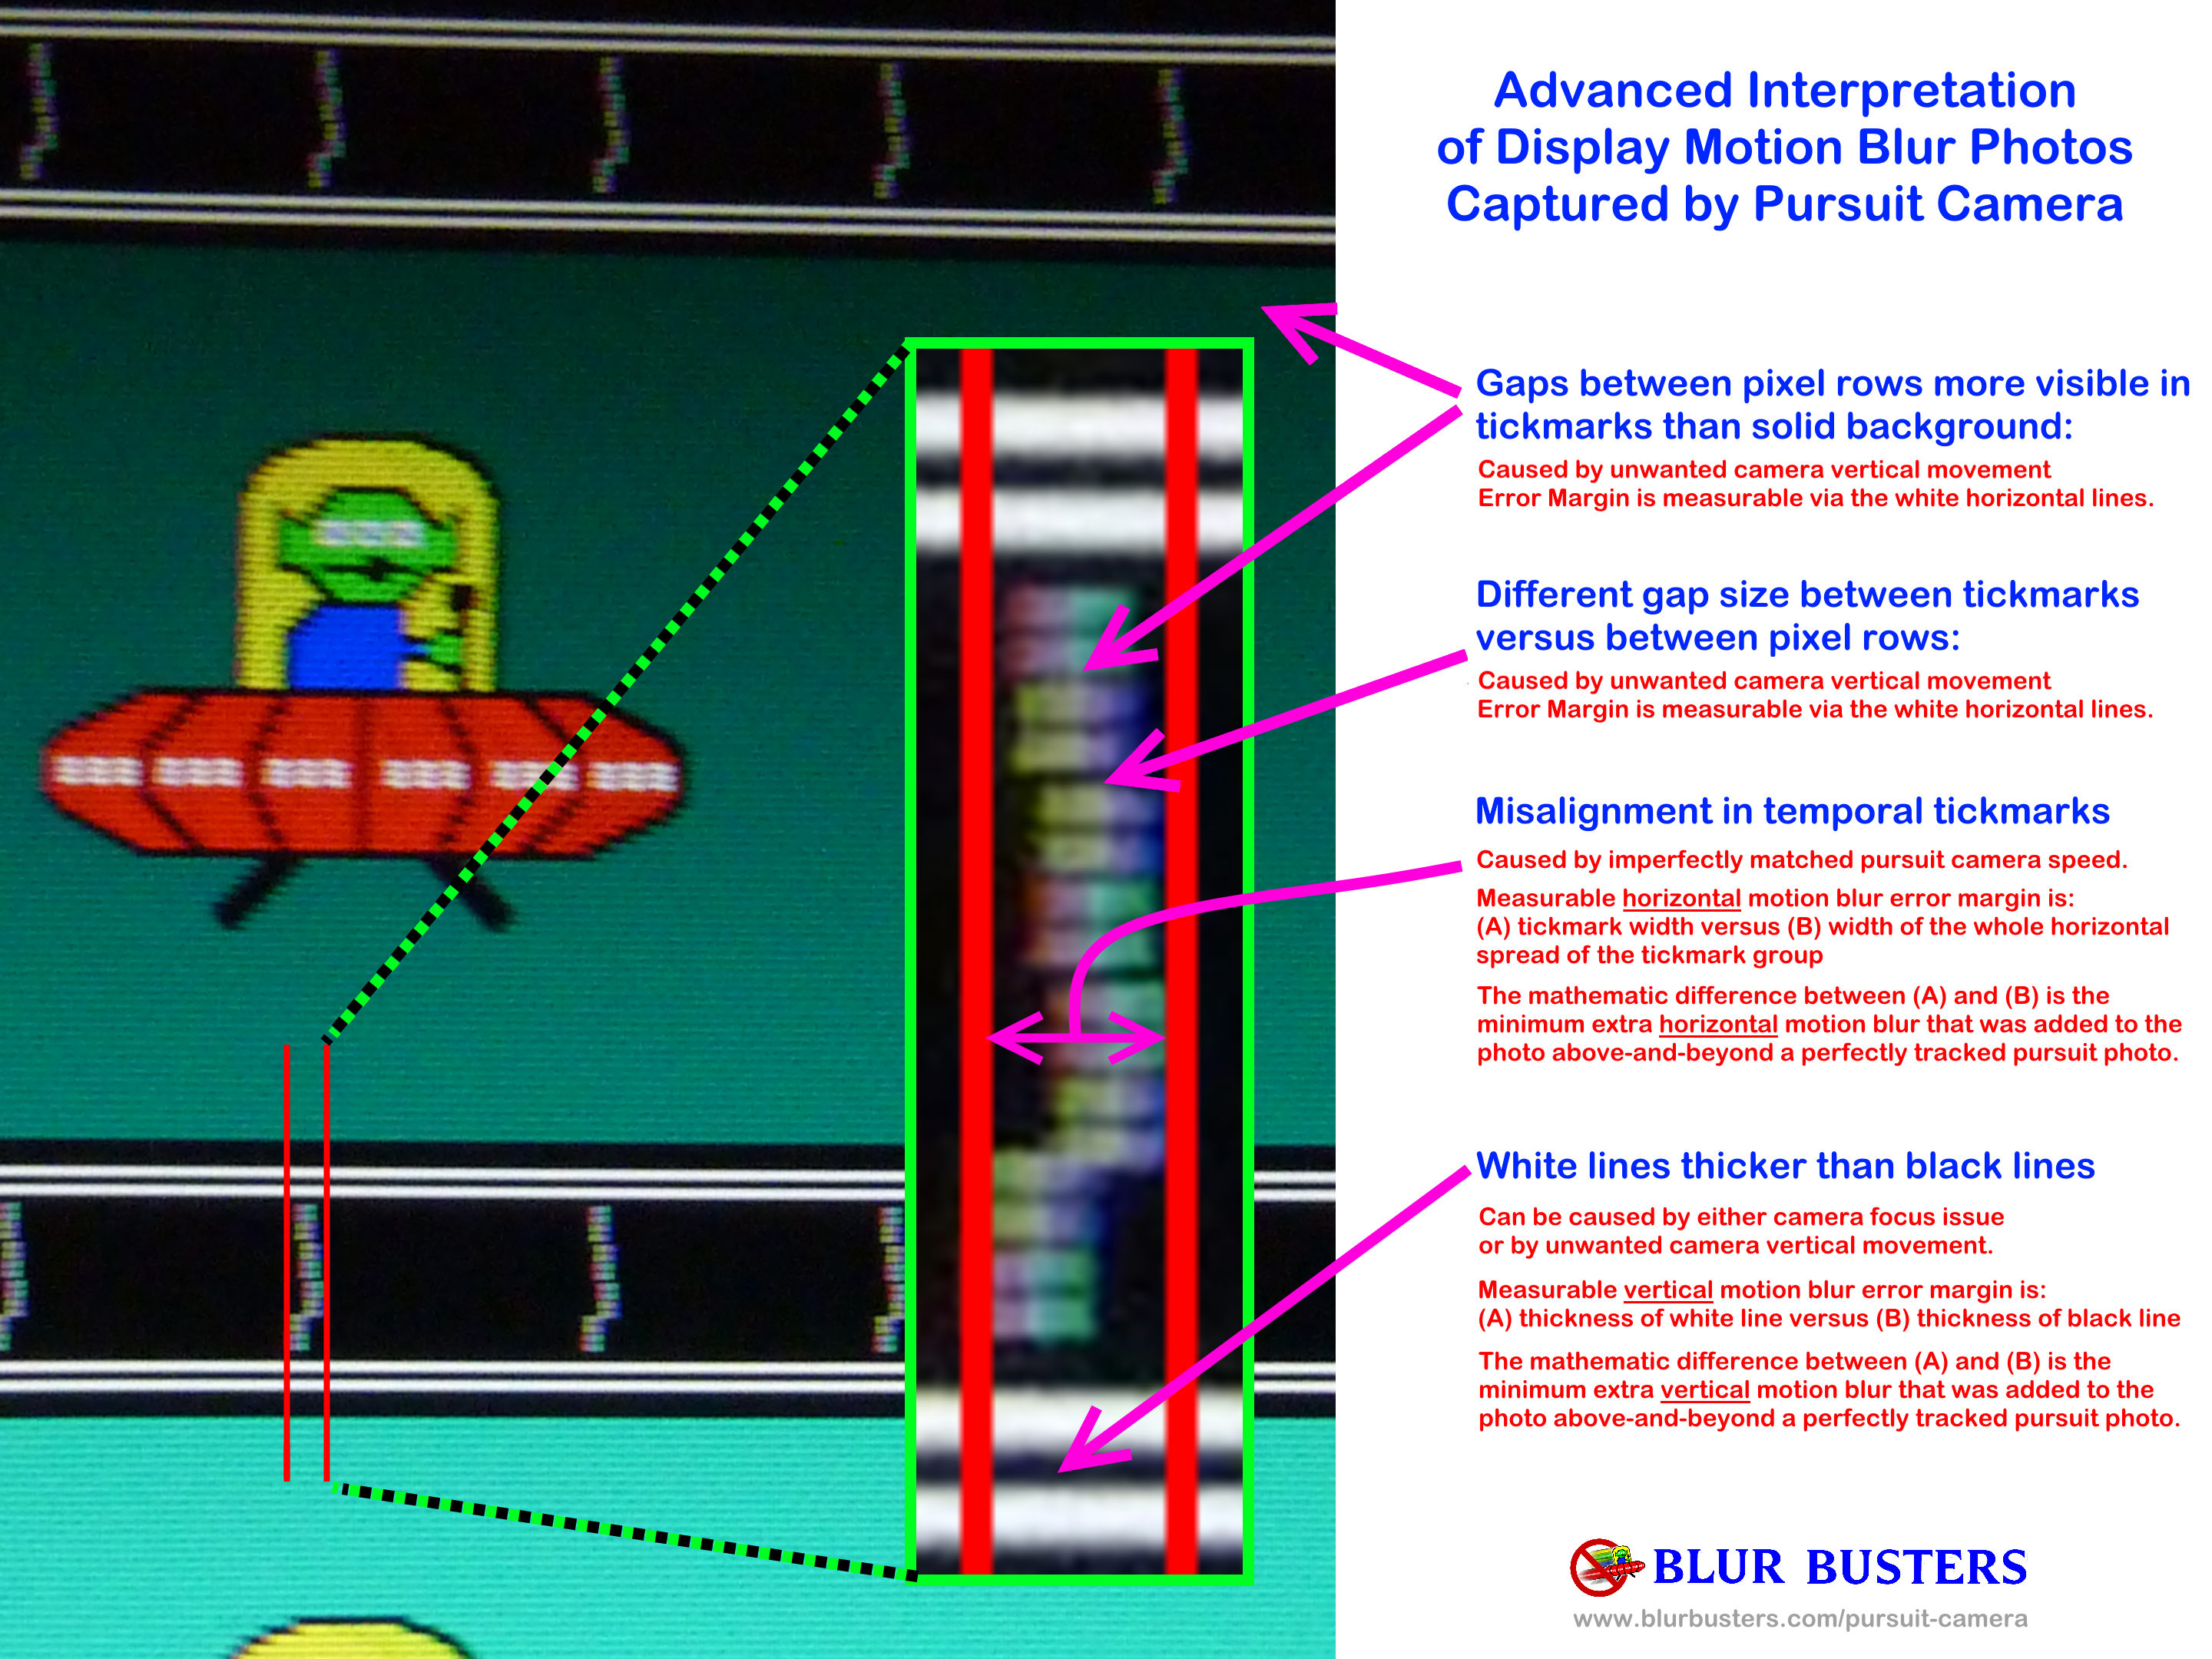
Advanced Interpretation of Pursuit Camera Images
To achieve very accurate sub-pixel motion blur capture, with mere tens of microns tracking error margin, this diagram is provided to simplify understanding how to interpret misalignments in the temporal tick marks:
About Blur Busters
Blur Busters Blog is the world’s first blog to utilize a pursuit camera photography for the accurate capture of motion artifacts, in WYSIWYG format, as seen by the human eye. For examples of Blur Busters pursuit camera photography, see LCD Motion Artifacts 101, and Blur Comparison: 60Hz vs 120Hz vs LightBoost.
Blur Busters invented this low-budget pursuit camera technique, seen on this page, that allows you to utilize off-the-shelf cameras and camera rails. It is now a peer reviewed conference paper, co-authored by Mark Rejhon, and tested by Nokia and NIST.gov researchers! For more information, contact mark[at]blurbusters.com.
This pursuit camera invention is free for anyone to use, as long as credit is given to Blur Busters.
Blur Busters now offers services for organizations and businesses including display manufacturers.