
Instructions for Zero Motion Blur on LightBoost LCD
HISTORY: These instructions, based on an original 2013 HOWTO, became extremely popular a decade ago. This HOWTO is still used today by users who still own these original monitors, as LightBoost was the first very popular desktop monitor motion blur reduction technology, and this HOWTO put Blur Busters on the map in 2013!
Supported LightBoost Monitors:
See Official List of Gaming Monitors. This is for LightBoost only. If you have another similar feature called ULMB (Ultra Low Motion Blur) or BENQ Blur Reduction, see Motion Blur Reduction FAQ.
LightBoost monitors have a strobe backlight feature that completely eliminate motion blur for 2D; for CRT-quality perfectly sharp fast motion on LCD.
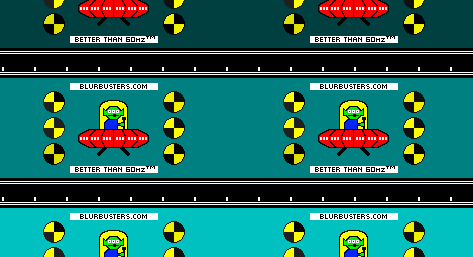
 Fast Motion Without LightBoost |
 Fast Motion With LightBoost |
| These are real photographs. Not simulated. See Comparision: 60fps vs 120fps vs LightBoost | |
There are rave reviews of LightBoost (“It’s like a CRT”) and media coverage including TFTCentral, ARS Technica, pcmonitors.info, NewEgg, and many others!
For scientific information on how LightBoost eliminates motion blur, see the LightBoost FAQ and high speed video of LightBoost, simulating a 120Hz CRT via a strobe backlight.
Editor’s Note: As of 2017, there are new LightBoost clones.
There are new brand names such as NVIDIA “Ultra Low Motion Blur” (ULMB), EIZO “Turbo240”, ASUS “Extreme Low Motion Blur” (ELMB), BenQ “Blur Reduction”, BenQ/Zowie “Dynamic Acceleration” (DyAc), all with better picture quality. If you have not purchased a monitor yet, you may wish to consider a newer blur reduction technology in the Official List of Gaming Monitors.
Select preferred LightBoost instructions:
Easy LightBoost via ToastyX Strobelight App
This is the world’s easiest way to use LightBoost to eliminate motion blur.
Easily turn ON/OFF LightBoost via a keypress! No hacks. No registry tweaks.
Does not require 3D Vision drivers.- First, Download ToastyX Strobelight.
IMPORTANT: You must have a supported 120Hz ASUS or 120Hz BENQ monitor!
IMPORTANT: LightBoost will not work with NVIDIA Optimus (laptops). - Next, run strobelight-setup to install strobed video modes. Then reboot.


IMPORTANT: To easily turn ON/OFF LightBoost, you must install at least one strobed refresh rate AND at least one non-strobed refresh rate. - Finally, after reboot, run strobelight to initialize LightBoost for the first time.
NOTE: You can add strobelight.exe to the Startup Folder, so it starts up everytime you starts Windows. - Test LightBoost using a motion test. View Moving Photo Test at TestUFO.com.
Turn ON/OFF LightBoost while viewing this motion test to see the big difference.
Test in Chrome or other 120Hz-friendly web browser (FireFox 24+, Opera 15+).
Useful LightBoost Tips:
- Turning ON/OFF LightBoost via hotkeys
Control+Alt+Plus — turns ON LightBoost
Control+Alt+Minus — turns OFF LightBoost - Other Ways to Verify that LightBoost is enabled:
(a) Check monitor OSD menus. The “LightBoost” adjustment should be unlocked.
(b) Wave a finger in front of a white screen. You should see a stroboscopic effect.
(c) Use a motion test such as www.testufo.com.
Turn ON/OFF LightBoost while repeating test, to see the big difference. - For better LightBoost colors, adjust your nVidia Control Panel:
nVidia Control Panel Desktop Brightness = 52%
nVidia Control Panel Desktop Contrast = 45%
nVidia Control Panel Desktop Gamma = 0.70
This compensates for the LightBoost gamma bump (washed out colors).
NOTE: If you get a purple tint, lower the Contrast setting via monitor’s menu until tint disappears. You can also adjust while viewing the Lagom Contrast Test Pattern. - For optimal benefit, run your games at triple-digit frame rates.
Microstutters become easier to detect if they’re no longer masked by motion blur. To eliminate stutters, run LightBoost at frame rates matching the refresh rate.
(a) Run at 100fps @ 100Hz, or run at 120fps @ 120Hz.
…Adjust game details or upgrade your GPU. Also try FXAA instead of FSAA.
(b) Experiment with VSYNC ON (may lag) or use “Adaptive VSYNC” (less input lag)
…These settings makes LightBoost framerate=Hz motion look much smoother, to allow game turning/strafing panning motion as smooth as TestUFO or PixPerAn.
(c) Use a good 1000Hz gaming mouse.
…Mouse microstutters can hurt motion clarity. LightBoost benefits from a mouse that can turn left/right as smoothly as keyboard strafing left/right. - For other information, see the LightBoost FAQ.
If you are unable to turn off LightBoost, simply re-run strobelight-setup.exe and install non-strobed refresh rates. Alternatively, simply unplug your monitor’s power cable for a few seconds to deactivate LightBoost.
- First, Download ToastyX Strobelight.
Alternate LightBoost HOWTO #2: If Using 3D Emitter Or Glasses Kit
Choose these alternate instructions if you have obtained the NVIDIA 3D Vision Kit, or it’s built into your monitor (e.g. ASUS VG278H). Works on all versions of Windows that 3D Vision is supported. These instructions allow you to keep LightBoost for both 2D and 3D.
If you prefer an easier method of enabling LightBoost with less input lag and less inconveniences, choose the Easy Strobelight method instead of these instructions below.
The procedure is simply set up stereoscopic 3D normally, launch the game in stereoscopic 3D, and then use Control+T to turn off stereoscopic operation. At this point, you have LightBoost in 2D and you can play normally with no glasses, and with no motion blur! No need to wear the 3D glasses if you don’t want to wear them. The steps are as follows:
- Make sure your monitor supports LightBoost (see 120Hz Monitors List)
- Get your favorite latest graphics drivers from nVidia (www.geforce.com).
- Make sure your glasses emitter is connected.
- Go to Control Panel -> Display -> Adjust Resolution.
- Verify “Enable Stereoscopic 3D settings for all displays” is enabled. (May be missing on Windows 7, skip this step).
- Go to NVIDIA Control Panel (system tray -> nVidia icon), and select “Setup Stereoscopic 3D”.
- Click “Test Stereoscopic 3D” and follow the vendor instructions to test it at 120Hz.
- Start a video game. The game should be running in stereoscopic 3D. This makes sure LightBoost is running, since it is automatically enabled during stereoscopic 3D.
- Hit Control-T inside the video game to turn off stereoscopic operation. This is an official keypress combination provided by official nVidia graphics drivers.
- Now you can play the game with no motion blur, for 120fps @ 120Hz gaming!
The LightBoost strobe backlight is still enabled, and you don’t need the 3D glasses. - Test motion fluidity with www.testufo.com/photo in Google Chrome or another 120Hz web browser.
- To keep LightBoost enabled at all times even at Windows Desktop, install this registry tweak. Download this registry file, and doubleclick on this file.
- For other information, See the LightBoost FAQ. (e.g. how to easily enable/disable)
Disadvantages:
- Unlike the ToastyX methods, you have to hit Control+T every time you launch a game, and 3D is not persistently enabled at the desktop (unless the optional registry tweak is installed).
- Some users have reported a lower framerate and more input lag with the Control+T method than the Unofficial Hack methods or the Easy ToastyX Strobelight method.
- Some games may need extra adjustment to work well with this (e.g. raising max_fps in Source engine games, or adjusting the VSYNC setting).
- You need frame rates matching (or exceeding) Hz for best benefit. Since LightBoost only works at 100Hz to 120Hz, you need 100fps@100Hz, or 120fps@120Hz.
TIP: Turning Off LightBoost:
To turn off LightBoost, either:
1. Switch to a non-LightBoost refresh rate; OR
2. Simply unplug monitor for a few seconds.
Make sure “Enable Stereoscopic 3D” checkbox in nVidia Control Panel is turned off.TIP: Improving Convenience, Stability & Eliminating “Control+T”:
Try the easy ToastyX Strobelight App instead, if you are more interested in motion blur elimination rather than 3D Vision.
Alternate LightBoost HOWTO #3: ToastyX Custom Resolution Utility
Choose these instructions only if you need more control than the Easy Strobelight Method. If you prefer the easy LightBoost method, choose a different set of LightBoost instructions.
- Get ToastyX Custom Resolution Utility (CRU).
Download this and run CRU. - Upon running ToastyX CRU, it will display a drop-down list.
It should have an entry for each monitor. If there are more entries (e.g. old monitors no longer in use) and you’re not sure which ones are active, run reset-all.exe and reboot. That should leave you with one entry for each connected monitor. - Use the “Edit…” button at the very top to set the product ID to ACI27F8 for each monitor. This will make the driver think you have a monitor with a built-in emitter.
This makes it easy to enable LightBoost for 2D. (The model name doesn’t matter) - Use the “Import…” button at the bottom to import this file: lightboost.bin
This includes the LightBoost modes (100Hz / 110Hz / 120Hz).
You can remove modes that you don’t need. If you have multiple monitors, use the copy & paste buttons at top to copy the resolutions to the other monitor entries. If you need 144Hz (non-LightBoost), add it using Timings “Reduced” instead of “Auto” - Click OK to save the changes, then reboot.
- In NVIDIA Control Panel, open the “Set up stereoscopic 3D” page, then click the “Run Setup Wizard” button. If the button isn’t there, uncheck “Enable stereoscopic 3D” and click the “Apply” button.
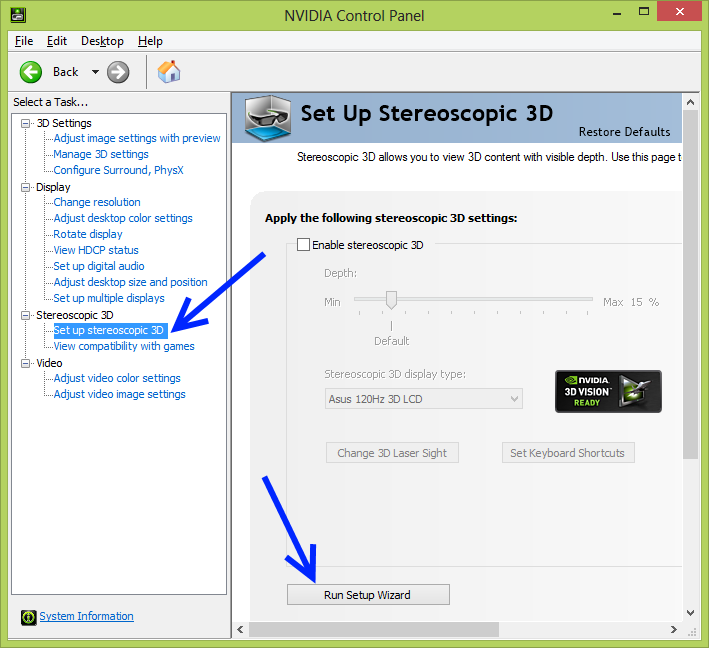
- In the setup wizard, click the “Next” button, then click “Next” again.
At this point, it should enable LightBoost. If don’t have an emitter, the mouse cursor may temporarily become very sluggish and jerky. If you don’t need to enable 3D (which may add input lag for LightBoost 2D), then you can exit here. Otherwise, continue the wizard as usual. - Quickly verify your LightBoost is enabled.
(a) Check the motion test at www.testufo.com/photo
(b) Check monitor’s OSD menus, the “LightBoost” adjustment is unlocked.
(c) Wave finger in front of a white screen. You should see a stroboscopic effect. - For better LightBoost colors, adjust your nVidia Control Panel:
nVidia Control Panel Desktop Brightness = 52%
nVidia Control Panel Desktop Contrast = 45%
nVidia Control Panel Desktop Gamma = 0.70
This compensates for the LightBoost gamma bump (washed out colors).
NOTE: For purple tint, lower the Contrast setting via monitor’s menu until the purple disappears. You can also adjust while viewing the Lagom Contrast Test Pattern. - Make sure you run your game at frame rates matching refresh rates. Motion clarity is so greatly improved, that microstutters and tearing can become more visible.
You need framerate matching Hz for maximum LightBoost benefit.
(a) You must run at 100fps @ 100Hz, or run at 120fps @ 120Hz.
(b) For best game performance, use VSYNC ON (may lag) or use Adaptive VSYNC (eliminate lag, best for competitive). These settings makes LightBoost framerate=Hz motion look much better, similar to TestUFO or PixPerAn.
(c) Use a good 1000Hz gaming mouse that can turn left/right as smoothly as keyboard strafing left/right. Mouse microstutters can hurt motion clarity. - Test motion fluidity with www.testufo.com/photo in Google Chrome or another 120Hz web browser.
TIP: Turning Off LightBoost:
To turn off LightBoost, either:
1. Switch to a non-LightBoost refresh rate; OR
2. Simply unplug monitor for a few seconds.
Make sure “Enable Stereoscopic 3D” checkbox in nVidia Control Panel is turned off.For Other Tips: See the LightBoost FAQ.
- Get ToastyX Custom Resolution Utility (CRU).
Alternate LightBoost HOWTO #4: Advanced EDID Override Method
This is the hardest and most advanced method. It requires no software and no 3D glasses emitter. It only requires nVidia 3D Vision drivers to be installed. Most users should use the easy LightBoost method instead of the below.
- Make sure your monitor supports LightBoost.
- Make sure you install the latest 3D Vision drivers from www.geforce.com.
- IMPORTANT (monitor-specific): If you’re using a monitor without an emitter (e.g. BENQ monitors, ASUS VG278HE or ASUS VG248QE) you must trick it into thinking it’s an ASUS VG278H (non-HE) by installing the EDID override INF file. (This is so nVidia drivers are able to be tricked into enabling LightBoost in 2D mode, without needing to own a shutter glasses emitter). Download the INF file here:
LightBoost-Monitor-EDID-override.inf
Supports Windows Vista, 7 and 8. Windows XP is NOT supported. - Install this INF file via Device Manager, then reboot.
Detailed instructions: First, right-click this INF file in File Explorer and select “Install”. Next, go to Device Manager and right-click your monitor, select “Update Driver Software”, then “Browser my computer…”, then “Let me pick…”, then disable “Show compatible hardware”, then select “LightBoost EDID Override” from manufacturer ASUS (even if you use BENQ) then reboot.
IMPORTANT (Windows 8 specific): If you’re installing under Windows 8,
follow these instructions to disable driver signature enforcement before installing this INF file. The INF file is installed via right-clicking the monitor in Control Panel -> Device Manager, and updating its driver. - Install registry tweak to enable LightBoost in 2D mode without shutter glasses:
ForceLightBoostWithoutGlasses.reg - Save this as a .reg file, double click on .reg file, add to registry, reboot.
- Go to Control Panel -> Display -> Adjust Resolution
- Check “Enable Stereoscopic 3D settings for all displays” is enabled (Windows 8 only)
- Go to NVIDIA Control Panel (system tray -> nVidia icon)

- Select “Set up Stereoscopic 3D” at left bar
- Select “Enable Stereoscopic 3D” checkbox
- Select “Asus 120Hz LCD” (even if you have a BENQ), and click Apply
Immediately, you should see a change in display colors. Immediately, you should see a change in display colors. - Quickly verify your LightBoost is enabled.
(a) Check the motion test at www.testufo.com/photo
(b) Check monitor’s OSD menus, the “LightBoost” adjustment is unlocked.
(c) Wave finger in front of a white screen. You should see a stroboscopic effect. - For better LightBoost colors, adjust your nVidia Control Panel:
nVidia Control Panel Desktop Brightness = 52%
nVidia Control Panel Desktop Contrast = 45%
nVidia Control Panel Desktop Gamma = 0.70
This compensates for the LightBoost gamma bump (washed out colors).
NOTE: For purple tint, lower the Contrast setting via monitor’s menu until the purple disappears. You can also adjust while viewing the Lagom Contrast Test Pattern. - Make sure you run your game at frame rates matching refresh rates. Motion clarity is so greatly improved, that microstutters and tearing can become more visible.
You need framerate matching Hz for maximum LightBoost benefit.
(a) You must run at 100fps @ 100Hz, or run at 120fps @ 120Hz.
(b) For best game performance, use VSYNC ON (may lag) or use Adaptive VSYNC (eliminate lag, best for competitive). These settings makes LightBoost framerate=Hz motion look much better, similar to TestUFO or PixPerAn.
(c) Use a good 1000Hz gaming mouse that can turn left/right as smoothly as keyboard strafing left/right. Mouse microstutters can hurt motion clarity. - Test motion fluidity with www.testufo.com/photo in Google Chrome or another 120Hz web browser.
- IMPORTANT: If certain games stubbornly launch in 3D mode (double image), press Control+T while inside the game, to make it switch back to 2D mode.
Alternate LightBoost HOWTO #5: Monitor Hardware Modification
It is possible to re-flash the monitor’s EDID to have LightBoost persistently enabled. This is an advanced method primarily useful for triple monitor surround LightBoost with newer GeForce drivers. For instructions, see Hardware LightBoost Modification HOWTO.
If you are a single-monitor user, this is overkill. See Easy LightBoost HOWTO.


Other Tips
Adjust your LightBoost setting for very sharp-looking fast motion:
Adjust your “LightBoost” OSD setting via monitor menus or via ToastyX Strobelight. This adjusts strobe length. Use any value except “OFF”. Lower values are dimmer but have sharper-looking fast motion. Higher values are brighter but have less clear-looking fast motion. The sharpest fast motion occurs at 10% but is very dim. 100% is bright and is good enough for most people. A good compromise setting is 50% in a darkened room. See PHOTOS: LightBoost 10% vs 50% vs 100% for a comparision of the settings.
Smooth Scrolling In Web Browser
Smooth scroll in web browsers: If you’re using Chrome and web browsing, install Chromium Smooth Scroller to gain the benefits of sharp text scrolling with the mouse wheel. Make sure the steering wheel icon is enabled in your Chrome toolbar.
The Resulting Zero Motion Blur
What happens?
- All trailing artifacts disappears! Ghosting, coronas, etc.
- All motion blur disappears!
- No motion blur when you play video games, even during fast motion.
- The zero motion blur effect will also occurs on the Windows desktop (e.g. window dragging, scrolling) if this LightBoost tweak is enabled in the Windows desktop.
How is it possible?
LightBoost is a programmable strobe backlight. The backlight is turned off while waiting for LCD to finish pixel transitions (unseen by human eyes), and the backlight is strobed only on fully-refreshed LCD frames (seen by human eyes). The strobes can be shorter than the panel’s pixel transitions, bypassing the pixel transition speed limit!
This is seen in high speed 1000fps video:
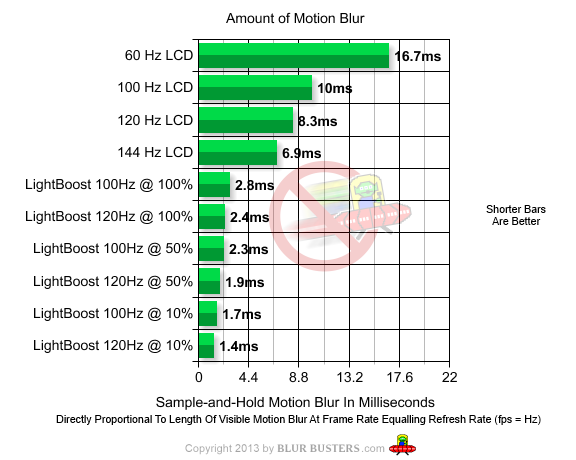
Motion blur is determined by the length of time a refresh is displayed on the screen. In addition to increased Hz, this can be further improved by flicker (black periods between refreshes, like a CRT). See this motion blur comparison:
Some notes:
- IMPORTANT: Optimus (laptops) is NOT supported.
- Minor Side Effects: Different color, dimmer screen brightness, some flicker feel (if sensitive to CRT flicker). The LightBoost FAQ has picture adjustment tips.
- LightBoost is hardware-limited to refresh rates between 100Hz and 120Hz.
For 144 Hz, LightBoost is turned off (automatically). Fortunately, there’s far less motion blur with 120 Hz LightBoost than with 144 Hz non-LightBoost. - You need framerate matching Hz for best LightBoost benefit.
(e.g. 100fps@100Hz or 120fps@120Hz) - The improved motion clarity can make tearing and stutters easier to see at higher framerates than normal. To compensate for this, upgrade your GPU for better fluidity, use a 1000Hz mouse for better fluidity, adjust game detail settings for better fluidity, and adjust VSYNC ON / OFF / Adaptive settings. In some situations, VSYNC ON (more lag) or Adaptive VSYNC (less lag) can make LightBoost motion smoother looking.
- For answers to common questions, see the LightBoost FAQ.
CRT style gaming on LCD
LightBoost provides gaming with a CRT-like clarity, with zero motion blur — allowing complete immersion without being distracted by motion blur. Improved competitive gaming scores are possible thanks to a faster reaction time. See improved Battlefield 3 statistics graphs.
A high end GPU is required (e.g. Geforce GTX 680, 780 or Titan) to frequently hit 120fps@120Hz most of the time to really notice the big improvement in motion clarity, with perfectly clear images even during fast turning and strafing. Also, it is necessary to disable the GPU artifical motion blur effects in video games, as that can ruin the LightBoost motion blur elimination. Also, some source-engine games needs their fps_max raised at the developer console, to play smooth.
For LightBoost help, feel free to ask your questions in the Blur Busters LightBoost Forum!
Supported LightBoost Monitors:
See Official List of Gaming Monitors. This is for LightBoost only. If you have another similar feature called ULMB (Ultra Low Motion Blur) or BENQ Blur Reduction, see Motion Blur Reduction FAQ.